Intermediate dataflow programming
On the Dataflow programming page, you learned the basics of using Rama’s dataflow API. On this page, we’ll delve deeper to look at the rest of the functionality available in Rama for dataflow programming. You’ll learn:
-
Commonly used utilities within Rama’s API
-
Batch blocks, a declarative form of dataflow programming with similar semantics as relational languages (like SQL)
-
Factoring reusable chunks of dataflow code with macros
Commonly used utilities within Rama’s API
Let’s start by taking a look at some additional helpful utilities in Rama’s API. We’ll start by looking at some built-in operations from the Ops class.
Ops.EXPLODE, Ops.TUPLE, and Ops.EXPAND
The first built-in operation to explore is Ops.EXPLODE. This operation simply emits every element of a list. Here’s an example:
List data = Arrays.asList(1, 2, 3, 4);
Block.each(Ops.EXPLODE, data).out("*v")
     .each(Ops.PRINTLN, "Elem:", "*v")
     .each(Ops.PRINTLN, "X")
     .execute();
Running this prints:
Elem: 1
X
Elem: 2
X
Elem: 3
X
Elem: 4
X
As you can see, the subsequent code is executed for each element emitted. Ops.EXPLODE is useful when you want to process the elements of a list individually.
Another useful built-in operation is Ops.TUPLE, which packages together many elements into a single list. For example:
Block.each(Ops.IDENTITY, 1).out("*a")
     .each(Ops.TUPLE, "*a", 3, 2).out("*tuple")
     .each(Ops.PRINTLN, "Tuple:", "*tuple")
     .execute();
Running this prints:
Tuple: [1 3 2]The inverse of Ops.TUPLE is Ops.EXPAND, which emits a var for every element of the provided list. Unlike Ops.EXPLODE, Ops.EXPAND binds every element of the list to a separate var. Here’s an example:
List tuple = Arrays.asList(1, 2, 3);
Block.each(Ops.EXPAND, tuple).out("*a", "*b", "*c")
     .each(Ops.PRINTLN, "Elements:", "*a", "*b", "*c")
     .execute();
Running this prints:
Elements: 1 2 3You should only use Ops.EXPAND when you know how many elements are in the input list.
subSource
A common need in ETL code is dispatching dataflow logic based on the type of the data being processed. While you can accomplish this with ifTrue blocks, such code can become cumbersome after just a couple types. For example, here’s code that dispatches with ifTrue based on whether the data is an Integer, String, or Long:
List data = Arrays.asList("a", 1, 3L);
Block.each(Ops.EXPLODE, data).out("*v")
     .ifTrue(new Expr(Ops.IS_INSTANCE_OF, Integer.class, "*v"),
       Block.each(Ops.PRINTLN, "Integer case", "*v"),
       Block.ifTrue(new Expr(Ops.IS_INSTANCE_OF, String.class, "*v"),
         Block.each(Ops.PRINTLN, "String case", "*v"),
         Block.ifTrue(new Expr(Ops.IS_INSTANCE_OF, Long.class, "*v"),
           Block.each(Ops.PRINTLN, "Long case", "*v"),
           Block.each(Ops.PRINTLN, "Unexpected type"))))
     .each(Ops.PRINTLN, "After")
     .execute();
Running this prints:
String case a
After
Integer case 1
After
Long case 3
After
All the nesting makes this code hard to read. Here’s a cleaner way to do this with subSource:
List data = Arrays.asList("a", 1, 3L);
Block.each(Ops.EXPLODE, data).out("*v")
     .subSource("*v",
       SubSource.create(Integer.class)
                .each(Ops.PRINTLN, "Integer case", "*v"),
       SubSource.create(String.class)
                .each(Ops.PRINTLN, "String case", "*v"),
       SubSource.create(Long.class)
                .each(Ops.PRINTLN, "Long case", "*v"))
     .each(Ops.PRINTLN, "After")
     .execute();
The elimination of the nesting makes it much easier to understand what’s happening here. The first argument to subSource is the object on which to dispatch. Then follows a series of SubSource blocks, which are just like a normal Block except created with the type to match on. subSource will execute the first SubSource block that matches the type of the object, and the SubSource blocks are checked in order.
As an example of how you would use subSource in a module, suppose you’re tracking "Follow" and "Unfollow" events to maintain a PState of followers for each user (like Twitter). You would keep these events on the same depot to preserve the order in which they happened. The ETL code that maintains that PState could use subSource to implement the differing behavior for how those events affect the PState. "Follow" events would add users into that PState, while "Unfollow" events would remove users.
yieldIfOvertime
One of the most empowering things about using Rama is how it colocates computation and data together. While you’re executing code on a task thread, whether an ETL or a query topology, you own that thread. This colocation enables fantastic efficiency since PState operations are local to that thread. And since no other events can run on that thread, you can attain properties like atomicity where your ETL event updates multiple PStates on a task and it’s impossible for subsequent events to ever see those PStates out of sync.
However, as the saying goes: with great power comes great responsibility. You have to make sure your events don’t block a task thread for an excessive amount of time. Doing so blocks other events from running on that task thread, like PState reads and other ETLs. For instance, suppose part of a microbatch topology you were writing needs to fetch all the elements of a large subindexed map as part of processing. Suppose those subindexed maps sometimes contain 2M elements, and suppose fetching all those elements takes 1000ms. While that microbatch topology event is running, it will delay all currently queued PState reads on that task by 1000ms. Colocated stream topologies will also be delayed by 1000ms. But microbatch topologies have loose latency requirements compared to PState reads or stream topologies, so it’s much better for your microbatch topology to break up large amounts of work like that into multiple small events. This allows those other events with tighter latency requirements to execute in between the microbatch topology events.
This particular use case is easily handled by using the .allowYield() option on the select call, but to illustrate the general problem let’s see what it would look like to solve the problem without that facility by paginating through the PState manually. Rama provides a way to do this with yieldIfOvertime. Let’s first look at how to analyze what constitutes a single event when looking at dataflow code. This will help you understand where those yieldIfOvertime calls should go. For example, consider the following ETL that manually paginates through a PState:
StreamTopology s = topologies.stream("s");
s.pstate("$$p", PState.mapSchema(Object.class, Object.class));
s.source("*depot").out("*k")
 .localTransform("$$p", Path.key("*k").termVal(0))
 .hashPartition("$$p2", "*k")
 .loopWithVars(LoopVars.var("*i", 0),
   Block.ifTrue(new Expr(Ops.LESS_THAN, "*i", 100),
     Block.localSelect("$$p2", Path.key("*k", "*i").sortedMapRangeFrom(0, 1000)).out("*m")
          .emitLoop("*m")
          .continueLoop(new Expr(Ops.INC, "*i"))
   )).out("*m")
 .shufflePartition()
 .each(Ops.PRINTLN, "Event")
 .hashPartition("*k")
 .localTransform("$$p", Path.key("*k").term(Ops.INC));
All code in between two "async boundaries" will run in the same event. An async boundary is where code moves to another task, or where a remote operation is performed. Async boundaries in Rama can be partitioners, localSelect calls on mirror PStates, or calls to external queues or databases. Because these are the only async boundaries it’s easy to see what will constitute an event.
Let’s now analyze this particular code assuming that "$$p2" is a colocated PState and not a mirror. In this case the events are broken up by the partitioner calls like so:
StreamTopology s = topologies.stream("s");
s.pstate("$$p", PState.mapSchema(Object.class, Object.class));
s.source("*depot").out("*k")

 // event 1
 .localTransform("$$p", Path.key("*k").termVal(0))

 .hashPartition("$$p2", "*k")

 // event 2
 .loopWithVars(LoopVars.var("*i", 0),
   Block.ifTrue(new Expr(Ops.LESS_THAN, "*i", 100),
     Block.localSelect("$$p2", Path.key("*k", "*i").sortedMapRangeFrom(0, 1000)).out("*m")
          .emitLoop("*m")
          .continueLoop(new Expr(Ops.INC, "*i"))
   )).out("*m")

 .shufflePartition()

 // event 3
 .each(Ops.PRINTLN, "Event")

 .hashPartition("*k")

 // event 4
 .localTransform("$$p", Path.key("*k").term(Ops.INC));
If an event only has a handful of PState calls and some dataflow computation, you don’t need to worry about it. The only concerning event here is event 2, since it’s doing 100 non-trivial PState queries in a loop. As currently written, this event will not complete until the loop has completely finished.
Fortunately, fixing this is extremely easy. You just need to add a call to yieldIfOvertime somewhere in the loop body, like so:
StreamTopology s = topologies.stream("s");
s.pstate("$$p", PState.mapSchema(Object.class, Object.class));
s.source("*depot").out("*k")
 .localTransform("$$p", Path.key("*k").termVal(0))
 .hashPartition("$$p2", "*k")
 .loopWithVars(LoopVars.var("*i", 0),
   Block.ifTrue(new Expr(Ops.LESS_THAN, "*i", 100),
     Block.yieldIfOvertime()
          .localSelect("$$p2", Path.key("*k", "*i").sortedMapRangeFrom(0, 1000)).out("*m")
          .emitLoop("*m")
          .continueLoop(new Expr(Ops.INC, "*i"))
   )).out("*m")
 .shufflePartition()
 .each(Ops.PRINTLN, "Event")
 .hashPartition("*k")
 .localTransform("$$p", Path.key("*k").term(Ops.INC));
That’s it! Now whenever the loop body executes, it checks if the current event is using too much time. If so, it suspends the event to allow other events to execute. Later the event will resume and continue where it left off.
yieldIfOvertime bases what "too much time" means from the "worker.event.target.max.millis" dynamic option (default 5ms). So if the event has not used up that much time yet, yieldIfOvertime is a quick no-op operation.
Let’s also analyze this code if "$$p2" is a mirror PState. In this case, the localSelect call inside the loop is an async boundary, so event 2 will naturally suspend through each iteration of the loop. So a yieldIfOvertime call would not be necessary in this case.
Rama’s self-monitoring can tell you if any of your code is improperly blocking task threads for excessive amounts of time. The "Event latency" chart breaks down event times for every category of event flowing through Rama. Categories containing the :topology-event tag correspond to your ETL or query topology code, and the chart will tell you the distribution of latencies for those events.
keepTrue
keepTrue is a simple dataflow method that stops a branch of computation if the argument is false. For example:
List data = Arrays.asList(1, 2, 3, 4);
Block.each(Ops.EXPLODE, data).out("*v")
     .keepTrue(new Expr(Ops.IS_EVEN, "*v"))
     .each(Ops.PRINTLN, "Val:", "*v")
     .execute();
Running this prints:
Val: 2
Val: 4
As you can see, the branches of computation for the vals 1 and 3 are terminated by the keepTrue call. keepTrue is commonly used alongside an Expr call to encode a condition for the callsite. Of course, you can also give keepTrue a value directly. This example can also be written as:
List data = Arrays.asList(1, 2, 3, 4);
Block.each(Ops.EXPLODE, data).out("*v")
     .each(Ops.IS_EVEN, "*v").out("*cond")
     .keepTrue("*cond")
     .each(Ops.PRINTLN, "Val:", "*v")
     .execute();
This has identical semantics as the version using Expr.
atomicBlock
Sometimes you want to perform a dynamic amount of work and only continue with additional dataflow code once that work is complete. atomicBlock provides a way to do this for certain situations. Here’s an example:
List data = Arrays.asList(1, 3, 4, 5);
Block.each((RamaFunction0) ArrayList::new).out("*list")
     .atomicBlock(
       Block.each(Ops.EXPLODE, data).out("*v")
            .each(Ops.INC, "*v").out("*v2")
            .each((List l, Object o) -> l.add(o), "*list", "*v2"))
     .each(Ops.PRINTLN, "List:", "*list")
     .execute();
Running this prints:
List: #object[java.util.ArrayList 0x6f37fb78 [2, 4, 5, 6]]This code creates a new list that increments every element from data. As you can see, the body of the atomicBlock runs one time for every element in data, and the code after the atomicBlock runs one time after all the work in the atomicBlock has completed. It doesn’t matter if the body reaches its end one time, zero times, or 100 times – the code after the atomicBlock will always run one time after completion of the body.
A critical subtlety of atomicBlock is it only coordinates on the synchronous computation within the body. So once all the synchronous work has completed, the code after the atomicBlock executes. Let’s explore this through an example:
public class AtomicBlockModule implements RamaModule {
  @Override
  public void define(Setup setup, Topologies topologies) {
    setup.declareDepot("*depot", Depot.random());

    StreamTopology s = topologies.stream("s");
    s.source("*depot").out("*list")
     .atomicBlock(
       Block.each(Ops.EXPLODE, "*list").out("*v")
            .each(Ops.PRINTLN, "A:", "*v")
            .shufflePartition()
            .each(Ops.PRINTLN, "B:", "*v"))
     .each(Ops.PRINTLN, "After atomicBlock");
  }

  public static void main(String[] args) throws Exception {
    try(InProcessCluster cluster = InProcessCluster.create()) {
      RamaModule module = new AtomicBlockModule();
      cluster.launchModule(module, new LaunchConfig(1, 1));
      String moduleName = module.getClass().getName();

      Depot depot = cluster.clusterDepot(moduleName, "*depot");

      depot.append(Arrays.asList(1, 2, 3, 4));
    }
  }
}
Running the main method prints:
A: 1
A: 2
A: 3
A: 4
After atomicBlock
B: 1
B: 2
B: 3
B: 4
This output demonstrates exactly how atomicBlock interacts with async boundaries like partitioners. Here you can see the body of the atomicBlock explodes every element of the provided list. Each of those branches of computation reaches the partitioner, whereupon they become a new outgoing event. Since the body is considered complete once all synchronous work has completed, the body is done after every element has been exploded and their branches of computation have reached the partitioner. This is why you see "After atomicBlock" printed at that point.
Lastly, you can see that the code after the partitioner no longer has any relation to the atomicBlock. Those events get to run once the event running the atomicBlock completes, which is only after "After atomicBlock" is printed. Importantly, the code after the atomicBlock never executes again as it’s only executed synchronously with the synchronous completion of the atomicBlock body.
atomicBlock will have a similar interaction with yieldIfOvertime. If you have a large amount of work to complete on a task, you want to coordinate on the completion of that work, and you want to be careful not to block the task thread for too long, you’ll generally be better off using a loop plus yieldIfOvertime rather than an atomicBlock plus yieldIfOvertime.
branch
In the tutorial, you learned about using hooks and anchors to control a dataflow graph in a fine-grained way. You can use hooks and anchors to create branching dataflow graphs such as:
Block.each(Ops.IDENTITY, 1).out("*a")
     .anchor("root")
     .each(Ops.PRINTLN, "Result 1:", new Expr(Ops.DEC, "*a"))
     .hook("root")
     .each(Ops.PRINTLN, "Result 2:", "*a")
     .execute();
The anchor call labels the .out("*a") node as "root", and the subsequent each calls each attach to that node. You can visualize this code like so:
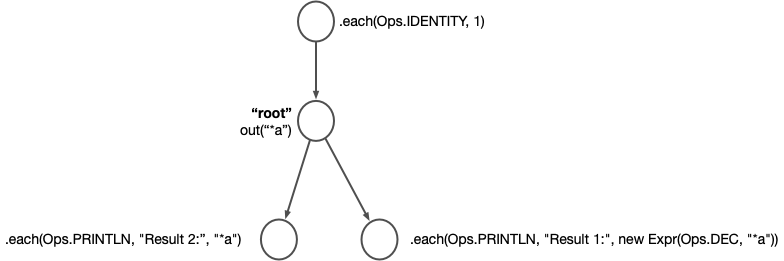
Nothing specifies the order in which to run those branches, so Rama picks randomly. 50% of the time you run this code you’ll see:
Result 1: 0
Result 2: 1
And the other 50% of the time you’ll see:
Result 2: 1
Result 1: 0
Block provides a helper method branch for specifying code like this a little differently. The above code can be rewritten as:
Block.each(Ops.IDENTITY, 1).out("*a")
     .anchor("root")
     .branch("root",
       Block.each(Ops.PRINTLN, "Result 1:", new Expr(Ops.DEC, "*a")))
     .each(Ops.PRINTLN, "Result 2:", "*a")
     .execute();
The dataflow graph for this code is identical to the previous example. branch attaches its subblock to the specified anchor, and subsequent code to the branch attaches to the code right before the branch.
In this case branch doesn’t really improve the code at all, but for larger branches the extra indentation from the subblock can help a lot with readability.
Branching like this can make topology code faster by running things in parallel instead of serially. Let’s compare two implementations of the same stream topology to see the difference:
// implementation 1
StreamTopology s = topologies.stream("s");
s.pstate("$$p", PState.mapSchema(Object.class, Long.class));
s.source("*depot").out("*tuple")
 .each(Ops.EXPAND, "*tuple").out("*k1", "*k2")
 .hashPartition("*k1")
 .compoundAgg("$$p", CompoundAgg.map("*k1", Agg.sum(1)))
 .hashPartition("*k2")
 .compoundAgg("$$p", CompoundAgg.map("*k2", Agg.sum(-1)));


// implementation 2
StreamTopology s = topologies.stream("s");
s.pstate("$$p", PState.mapSchema(Object.class, Long.class));
s.source("*depot").out("*tuple")
 .each(Ops.EXPAND, "*tuple").out("*k1", "*k2")
 .anchor("root")
 .hashPartition("*k1")
 .compoundAgg("$$p", CompoundAgg.map("*k1", Agg.sum(1)))
 .branch("root",
   Block.hashPartition("*k2")
        .compoundAgg("$$p", CompoundAgg.map("*k2", Agg.sum(-1))));
The first implementation partitions to the task for "*k1", then increments the value for "*k1" in the PState, then partitions to the task for "*k2", and finally decrements the value for "*k2" in the PState.
The second implementation, on the other hand, performs the partitions for "*k1" and "*k2" in the same event. The order in which those partitions happen is undefined, but it doesn’t matter what order Rama chooses since the subsequent code in each branch is independent. The updates for both "*k1" and "*k2" then happen in parallel, reducing the latency of this stream topology compared to the first example.
Batch blocks
Batch blocks are an execution mode for dataflow code that enables some powerful new functionality. Whereas the dataflow code you’ve seen so far is imperative, with operations executing in exactly the order you specify them, batch blocks are partially declarative. This means you specify your computation at a more abstract level and Rama decides how that translates to a sequence of operations. As you’re about to see, some of the functionality enabled includes inner joins, outer joins, two-phase aggregation, and the ability to coordinate around batches of computation. The semantics of batch blocks are similar to relational languages like SQL, though expressed differently.
Microbatch topologies can use batch blocks through the batchBlock method, query topologies are implicitly batch blocks, and stream topologies do not support them.
Batch blocks can also be used in blocks disconnected from modules, so let’s start with a simple example in that context to understand the basic concepts:
List data = Arrays.asList(1, 2, 3, 4);
Block.each(Ops.PRINTLN, "Starting batch block")
     .batchBlock(
        Block.each(Ops.EXPLODE, data).out("*v")
             .each(Ops.PRINTLN, "Data:", "*v")
             .agg(Agg.count()).out("*count")
             .agg(Agg.sum("*v")).out("*sum")
             .each(Ops.PRINTLN, "Count:", "*count")
             .each(Ops.PRINTLN, "Sum:", "*sum"))
     .each(Ops.PRINTLN, "Finished batch block")
     .execute();
Running this prints:
Starting batch block
Data: 1
Data: 2
Data: 3
Data: 4
Count: 4
Sum: 10
Finished batch block
A batch block runs in three phases: the "pre-agg phase", the "agg phase", and the "post-agg phase". Each phase completes before the next phase executes.
The code you write in a batch block is divided into phases based on where you put your aggregator calls. An aggregator call can either be a call to agg or compoundAgg. The code before the aggregator calls will be the pre-agg phase, and the code after will be the post-agg phase. So here’s how the phases break down in this example:
List data = Arrays.asList(1, 2, 3, 4);
Block.each(Ops.PRINTLN, "Starting batch block")
     .batchBlock(
        Block
             // pre-agg phase
             .each(Ops.EXPLODE, data).out("*v")
             .each(Ops.PRINTLN, "Data:", "*v")

             // agg phase
             .agg(Agg.count()).out("*count")
             .agg(Agg.sum("*v")).out("*sum")

             // post-agg phase
             .each(Ops.PRINTLN, "Count:", "*count")
             .each(Ops.PRINTLN, "Sum:", "*sum"))
     .each(Ops.PRINTLN, "Finished batch block")
     .execute();
With the understanding that the phases complete in order, you can see why the lines in the output were printed in that order. The lines with "Data:" are part of the pre-agg phase, and the "Count:" and "Sum:" lines are part of the post-agg phase. You can also see how the code after a batchBlock only executes once the entire batchBlock completes.
Let’s now dive deeper into each phase.
Pre-agg phase
The pre-agg phase reads one or more "batch sources" and combines them together into a single branch of computation for the agg phase. Separate batch sources can be combined either through merges or joins.
The example you’ve seen had just a single batch source. Let’s take a look at an example with two batch sources that are merged together:
List source1 = Arrays.asList(1, 2);
List source2 = Arrays.asList(2, 3);
Block.batchBlock(
       Block.each(Ops.EXPLODE, source1).out("*v")
            .each(Ops.PRINTLN, "Source 1:", "*v")
            .anchor("source1")

            .freshBatchSource()
            .each(Ops.EXPLODE, source2).out("*v")
            .each(Ops.PRINTLN, "Source 2:", "*v")
            .anchor("source2")

            .unify("source1", "source2")
            .each(Ops.PRINTLN, "Merged:", "*v")

            .agg(Agg.sum("*v")).out("*sum")
            .each(Ops.PRINTLN, "Sum:", "*sum"))
     .execute();
Running this prints:
Source 2: 2
Merged: 2
Source 2: 3
Merged: 3
Source 1: 1
Merged: 1
Source 1: 2
Merged: 2
Sum: 8
There are a few things to note here. First is the use of freshBatchSource to create a new batch source. The code subsequent to that call constitutes the implementation of the batch source. This batch block can be visualized like so:
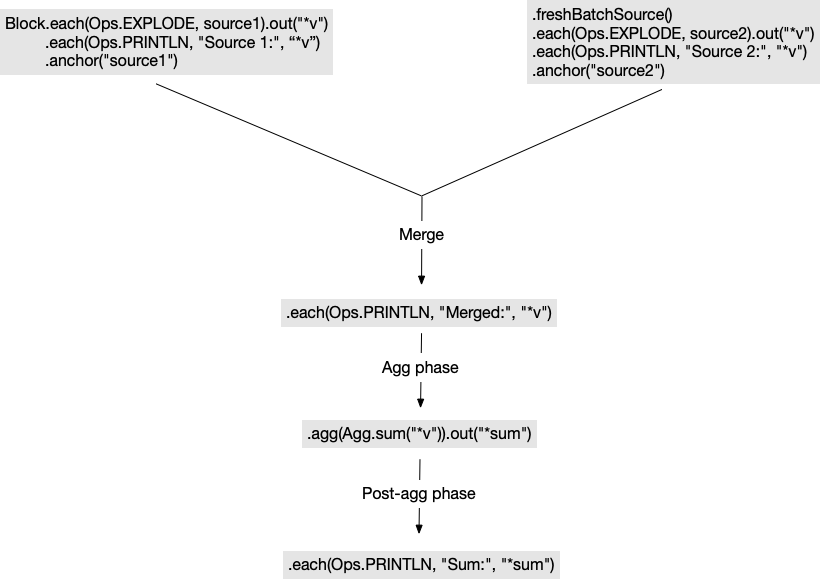
Each batch source is a root of computation, and the order in which Rama executes the roots is arbitrary. The resulting computation is the same regardless of the order Rama chooses. In a module, the batch sources can be distributed and run in parallel.
In this case, you can see Rama chooses "Source 2" to run first. You can also see how unification works exactly the same in a batch block as it does in regular dataflow code. Rather than compute the batch sources in their entirety before executing the merge, the data being emitted from the batch sources flows directly into the unification. The merge itself follows all the normal rules of unification, namely that the vars in scope after the unify call are the vars common to each branch.
Next, let’s see what happens when you have multiple batch sources that aren’t merged together. In this case, Rama will try to join them together.
Before diving into joins, note that joins are needed much less frequently in Rama as in relational database systems. This is because your indexes (PStates) are generally shaped much closer to what your queries need than you find in relational databases. With that said, the need does come up sometimes so Rama has full support for all kinds of joins. Let’s start exploring them with another example:
List source1 = Arrays.asList(Arrays.asList("a", 1),
                             Arrays.asList("b", 2),
                             Arrays.asList("c", 3));
List source2 = Arrays.asList(Arrays.asList("a", 10),
                             Arrays.asList("a", 11),
                             Arrays.asList("c", 30));
Block.batchBlock(
  Block.each(Ops.EXPLODE, source1).out("*tuple1")
       .each(Ops.EXPAND, "*tuple1").out("*k", "*v1")

       .freshBatchSource()
       .each(Ops.EXPLODE, source2).out("*tuple2")
       .each(Ops.EXPAND, "*tuple2").out("*k", "*v2")

       .each(Ops.PRINTLN, "Joined:", "*k", "*v1", "*v2"))
     .execute();
Running this prints:
Joined: a 1 10
Joined: a 1 11
Joined: c 3 30
First of all, this batch block has no aggregators in it. This means it has no agg phase or post-agg phase and is a pre-agg only batch block. Batch blocks of this form still have the same semantics for the pre-agg phase where all batch sources must combine through merges and joins into a single branch.
This code does an inner join of the two batch sources on the key "*k". Now you’re probably wondering – how is this code performing a join? Where’s the "INNER JOIN" statement? The answer is joins are implicit in Rama and based on the names of the vars in each batch source. This is a much more concise way to specify joins than having to explicitly specify joins and the join vars to use. Even though they’re implicit, Rama has the same expressive power with joins as SQL. It can do inner joins, outer joins, or any combination thereof.
Here’s a visualization of this example:
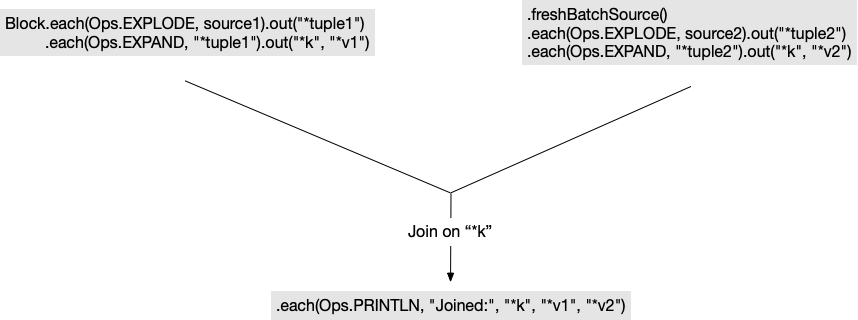
To understand what’s happening here, let’s look at how Rama builds the dataflow graph for a batch block. Like regular dataflow code, Rama builds the dataflow graph by attaching nodes in the order in which you write them. In this example, the first node is .each(Ops.EXPLODE, source1), the second node is .out("*tuple1"), the third is .each(Ops.EXPAND, "*tuple1"), and so on. The first node always starts a new batch source, and subsequent nodes attempt to attach to the last attached node. A node can only be attached if the branch contains all vars needed by the new node.
freshBatchSource is a directive to force the next node to begin a new batch source at the root. unify works exactly as it does in regular dataflow code by merging the specified parent nodes into a single child node.
Finally, there’s the logic of what happens when the next node is unable to attach to the last attached node. In this case Rama attempts to perform joins between batch sources until all the vars needed for the next node are available in one branch. Whether Rama can perform a join between two batch sources, and the kind of join that’s performed, depends on the names of the vars in each batch source. If there are many batch sources and many possible joins, Rama does a search for a join ordering that produces a valid pre-agg configuration.
In this example, when Rama looks to attach .each(Ops.PRINTLN, "Joined:", "*k", "*v1", "*v2") it sees the current branch only has vars "*tuple2", "*k", and "*v2". Since the branch is missing "*v1", Rama tries to join the two batch sources together.
Batch sources can join when they share at least one var in common. Then they will join on all the common vars. In this example, the only common var is "*k" so that’s the only var used for the join. Had this example used the var name "*tuple" instead of "*tuple1" and "*tuple2", then the join would have been on both "*k" and "*tuple". This would change the semantics of the join and the results of the example.
We’ll come back to joins later on this page to explore outer joins. Before we get to that let’s continue exploring the phases of batch blocks.
Agg phase
At the end of the pre-agg phase is a single branch of computation which feeds into the declared aggregators. In the tutorial, you saw how aggregators can be used to update existing PStates. They can do that within batch blocks as well, but they can also be used to compute aggregated values over the data emitted by the pre-agg phase.
Here’s an example of a module using a batch block to update an existing PState:
public class GlobalSumModule implements RamaModule {
  @Override
  public void define(Setup setup, Topologies topologies) {
    setup.declareDepot("*depot", Depot.random());

    MicrobatchTopology mb = topologies.microbatch("mb");
    mb.pstate("$$sum", Long.class).global().initialValue(0L);
    mb.source("*depot").out("*microbatch")
     .each(Ops.PRINTLN, "Beginning microbatch")
     .batchBlock(
       Block.explodeMicrobatch("*microbatch").out("*v")
            .each(Ops.PRINTLN, "Pre-agg:", "*v")
            .globalPartition()
            .agg("$$sum", Agg.sum("*v"))
            .localSelect("$$sum", Path.stay()).out("*sum")
            .each(Ops.PRINTLN, "Post-agg:", "*sum"));
  }

  public static void main(String[] args) throws Exception {
    try(InProcessCluster cluster = InProcessCluster.create()) {
      RamaModule module = new GlobalSumModule();
      cluster.launchModule(module, new LaunchConfig(4, 4));
      String moduleName = module.getClass().getName();

      Depot depot = cluster.clusterDepot(moduleName, "*depot");
      PState sum = cluster.clusterPState(moduleName, "$$sum");

      depot.append(1);
      depot.append(2);
      depot.append(3);
      depot.append(4);

      cluster.waitForMicrobatchProcessedCount(moduleName, "mb", 4);
      System.out.println("Sum: " + sum.selectOne(Path.stay()));
    }
  }
}
This module uses Ops.PRINTLN calls to track what’s happening at the beginning of the microbatch, in the pre-agg phase, in the post-agg phase, and from a client after the microbatch completes. Because microbatches run continuously, even when there’s no data, the outputs can vary. Here’s one sample output from running main:
Beginning microbatch
Post-agg: 0
Beginning microbatch
Pre-agg: 4
Pre-agg: 1
Pre-agg: 3
Pre-agg: 2
Post-agg: 10
Beginning microbatch
Sum: 10
Post-agg: 10
The first microbatch ran with no data, so the PState didn’t update and its value was 0 in the post-agg. The next microbatch picks up all the data appended in the main method. You can see the post-agg code runs once after the agg phase completes. Then another microbatch starts at that point at the same time the PState client queries for the sum.
There’s a few interesting things to note here. First of all, this microbatch is doing a global aggregation across all data on all partitions of a depot. If Rama were sending all data to a single task before aggregating, this would not be scalable. However, "combiner aggregators" can execute much more efficiently in batch blocks by performing an optimization called "two-phase aggregation". In this case, partial sums are computed on each task before sending data across globalPartition() to a single task. You can read more about this on the Aggregators page.
The second interesting note is how the post-agg phase runs. In this example it runs only on the task where the global PState "$$sum" lives. This is a consequence of the final partitioner of the pre-agg phase. If the final partitioner is globalPartition, the post-agg phase will only run on that one task. If the final partitioner is another partitioner like hashPartition, it will run on every task. Because a final partitioner is required for Rama to know where to run the post-agg phase, a final partitioner must be declared in the pre-agg phase if your batch block contains any aggregators (i.e. is not a pre-agg only batch block).
Here’s an example module whose post-agg phase runs on every task:
public class PostAggAllTasksModule implements RamaModule {
  @Override
  public void define(Setup setup, Topologies topologies) {
    setup.declareDepot("*depot", Depot.random());

    MicrobatchTopology mb = topologies.microbatch("mb");
    mb.pstate("$$p", PState.mapSchema(String.class, Long.class));
    mb.source("*depot").out("*microbatch")
      .each(Ops.PRINTLN, "Beginning microbatch")
      .batchBlock(
        Block.explodeMicrobatch("*microbatch").out("*k")
             .each(Ops.PRINTLN, "Pre-agg:", "*k")
             .hashPartition("*k")
             .compoundAgg("$$p", CompoundAgg.map("*k", Agg.count()))
             .localSelect("$$p", Path.stay()).out("*m")
             .each(Ops.PRINTLN, "Post-agg:", "*m"));
  }

  public static void main(String[] args) throws Exception {
    try(InProcessCluster cluster = InProcessCluster.create()) {
      RamaModule module = new PostAggAllTasksModule();
      cluster.launchModule(module, new LaunchConfig(2, 2));
      String moduleName = module.getClass().getName();

      Depot depot = cluster.clusterDepot(moduleName, "*depot");

      depot.append("a");
      depot.append("b");
      depot.append("a");
      depot.append("g");
      depot.append("d");
      depot.append("d");

      cluster.waitForMicrobatchProcessedCount(moduleName, "mb", 6);
    }
  }
}
Here’s a sample output from running this:
Beginning microbatch
Post-agg: {}
Post-agg: {}
Beginning microbatch
Pre-agg: a
Pre-agg: g
Pre-agg: b
Pre-agg: d
Pre-agg: a
Pre-agg: d
Post-agg: {b 1, d 2}
Post-agg: {a 2, g 1}
Beginning microbatch
Post-agg: {b 1, d 2}
Post-agg: {a 2, g 1}
This module is launched with two tasks, and as you can see every post-agg phase prints two lines corresponding to the value of the PState partition for "$$p". Because a hashPartition call can go to any task, the post-agg phase will run on every task. Importantly, it doesn’t matter which tasks actually did aggregation during the agg phase – the post-agg phase will run on every task regardless.
The agg phase can have as many aggregators as you wish, and each aggregator will consume all the input from the pre-agg phase. Your aggregator calls can be a mix of agg and compoundAgg calls. Rama also has a groupBy feature similar to "GROUP BY" from SQL. This allows you to divide up aggregation according to one or more keys. You can read more about this on the Aggregators page.
Post-agg phase
The post-agg phase has mostly been covered already. To summarize, the post-agg phase runs after the agg phase completes on tasks according to the final partitioner of the pre-agg phase. The variables in scope when the post-agg phase begins are any vars emitted by aggregators during the agg phase. Nothing from the pre-agg phase is in scope because all that data has been aggregated.
Partitioners are not allowed in the post-agg phase. The post-agg phase is for post-processing of aggregated data. This is frequently done in subbatches, as will be explained in the next section.
Subbatches
Subbatches in Rama provide the capability to do more than one round of aggregation for a batch block. With subbatches you can aggregate your aggregates. They’re analagous to subqueries in SQL and allow batch blocks to consume the results of other batch blocks. Subbatches greatly increase the expressive power of batch blocks.
Here’s a simple example of a subbatch in action:
private static SubBatch wordCount(List source) {
  Block b = Block.each(Ops.EXPLODE, source).out("*k")
                 .compoundAgg(CompoundAgg.map("*k", Agg.count())).out("*m")
                 .each(Ops.EXPLODE_MAP, "*m").out("*k", "*count");
  return new SubBatch(b, "*k", "*count");
}

public static void simpleSubbatchExample() {
  List source = Arrays.asList("a", "b" ,"c", "a");
  Block.batchBlock(
    Block.subBatch(wordCount(source)).out("*k", "*c")
         .each(Ops.PRINTLN, "From subbatch:", "*k", "*c")
         .agg(Agg.max("*c")).out("*maxCount")
         .each(Ops.PRINTLN, "Max count:", "*maxCount"))
       .execute();
}
From a list of words, this code computes the count of each word and then finds the highest count. The key line is Block.subBatch(wordCount(source)).out("*k", "*c"). This starts off that batch source with whatever is emitted from the output of the given subbatch. A subbatch is its own batch block with its own pre-agg, agg, and post-agg phases (pre-agg only subbatches are allowed too).
The subbatch code computes the word counts (you could also do this with groupBy). EXPLODE_MAP works like EXPLODE except operates over a map and emits the keys and the values. The expression new SubBatch(b, "*k", "*count") specifies the subbatch is implemented with the given Block and emits the given vars. The given vars must be in scope at the end of the provided Block.
This simple API unlocks a lot of power for batch blocks. Subbatches compose infinitely – batch blocks can consume many subbatches, subbatches can build off of other subbatches, and so on. You can even compute subbatches dynamically.
Subbatches work exactly the same in modules and follow all the same rules of regular batch blocks, like needing a final partitioner if it has aggregators. Let’s take a look at using a subbatch in a module.
The following example is based off of the "who to follow" implementation in our Twitter-scale Mastodon implementation. "Who to follow" provides personalized recommendations based on who’s most followed by a user’s current follows. It continuously iterates through all users on the platform and recomputes each user’s recommendations every so often (frequency depends on number of users and number of resources allocated to the module). Since "who to follow" isn’t useful for new users who don’t follow many users yet, and since you want new users to get recommendations as soon as possible, part of the implementation is detecting when a user has broken certain thresholds of follow counts in order to recompute their recommendations immediately. This example implements that threshold detection.
The module consumes a depot of "follow events", represented as a tuple of two user ID strings. When a user ID is detected to pass certain numbers of follows, it will be written to the "$$forceRecomputeUsers" PState. The part that recomputes recommendations consumes that PState.
To keep the example simple, we’ll show just the threshold detection part. Check out the Mastodon code to see the full "who to follow" implementation. Here’s the code:
public class FollowThresholdModule implements RamaModule {
  private SubBatch followCounts(String microbatchVar) {
    Block b = Block.explodeMicrobatch(microbatchVar).out("*follow")
                   .each(Ops.EXPAND, "*follow").out("*userId", "*followedUserId")
                   .groupBy("*userId", Block.agg(Agg.count()).out("*count"));
    return new SubBatch(b, "*userId", "*count");
  }

  public static boolean brokeThreshold(int currCount, int newCount) {
    return currCount < 2 && newCount >= 2 || currCount < 6 && newCount >= 6;
  }

  @Override
  public void define(Setup setup, Topologies topologies) {
    setup.declareDepot("*followsDepot", Depot.random());

    MicrobatchTopology threshold = topologies.microbatch("threshold");
    threshold.pstate("$$followCounts", PState.mapSchema(String.class, Integer.class));
    threshold.pstate("$$forceRecomputeUsers", Set.class);

    threshold.source("*followsDepot").out("*microbatch")
             .batchBlock(
               Block.subBatch(followCounts("*microbatch")).out("*userId", "*count")
                    .localSelect("$$followCounts", Path.key("*userId").nullToVal(0)).out("*currCount")
                    .each(Ops.PLUS, "*currCount", "*count").out("*newCount")
                    .each(Ops.PRINTLN, "User", "*userId", "*currCount", "->", "*newCount")
                    .ifTrue(new Expr(FollowThresholdModule::brokeThreshold, "*currCount", "*newCount"),
                      Block.each(Ops.PRINTLN, "User broke threshold:", "*userId")
                           .localTransform("$$forceRecomputeUsers", Path.voidSetElem().termVal("*userId")))
                    .localTransform("$$followCounts", Path.key("*userId").termVal("*newCount")));
  }

  public static void main(String[] args) throws Exception {
    try(InProcessCluster cluster = InProcessCluster.create()) {
      RamaModule module = new FollowThresholdModule();
      cluster.launchModule(module, new LaunchConfig(2, 2));
      String moduleName = module.getClass().getName();

      Depot followsDepot = cluster.clusterDepot(moduleName, "*followsDepot");

      System.out.println("Round 1");
      followsDepot.append(Arrays.asList("jamescagney", "bettedavis"));
      followsDepot.append(Arrays.asList("vivienleigh", "dorisday"));
      followsDepot.append(Arrays.asList("dorisday", "bettedavis"));
      cluster.waitForMicrobatchProcessedCount(moduleName, "threshold", 3);

      System.out.println("Round 2");
      followsDepot.append(Arrays.asList("jamescagney", "marlonbrando"));
      followsDepot.append(Arrays.asList("jamescagney", "jacklemmon"));
      cluster.waitForMicrobatchProcessedCount(moduleName, "threshold", 5);

      System.out.println("Round 3");
      followsDepot.append(Arrays.asList("jamescagney", "henryfonda"));
      followsDepot.append(Arrays.asList("jamescagney", "lucilleball"));
      followsDepot.append(Arrays.asList("vivienleigh", "lucilleball"));
      followsDepot.append(Arrays.asList("jamescagney", "gracekelly"));
      cluster.waitForMicrobatchProcessedCount(moduleName, "threshold", 9);
    }
  }
}
For each user with new follows in the microbatch, the topology computes the user’s number of follows before and after updating the "$$followCounts" PState. The usage of a batchBlock enables the topology to only read the "$$followCounts" PState once per user. Even if a user has 50 follows in the microbatch, "$$followCounts" will be queried once for that user.
The subbatch computes the number of follow events for each user in the microbatch. It uses groupBy which implicitly inserts a hashPartition call. This hashPartition will be the final partitioner for the subbatch.
The top-level batch block uses the information from the subbatch to query "$$followCounts" for the current follow count, check whether a threshold was passed, and update "$$followCounts". When a threshold is passed, the user ID is added to "$$forceRecomputeUsers". Very low thresholds are used in this module for demonstration purposes – in a real deployment higher threshold values like 10 and 100 would make more sense.
The Ops.PRINTLN calls in the module show the changes in user follow counts and when a user is detected to have broken a threshold. Running main prints:
Round 1
User vivienleigh 0 -> 1
User jamescagney 0 -> 1
User dorisday 0 -> 1
Round 2
User jamescagney 1 -> 3
User broke threshold: jamescagney
Round 3
User vivienleigh 1 -> 2
User jamescagney 3 -> 6
User broke threshold: jamescagney
User broke threshold: vivienleigh
You can see "jamescagney" passes both thresholds while "vivienleigh" passes only the first. The rest of the "who to follow" implementation in Mastodon uses subbatches in other interesting ways, so be sure to check out the implementation to learn more.
For another example of using a subbatch within a module, check out this example from Aggregators which uses a microbatch topology to maintain a PState of top words based on word count.
Invalid batch blocks
Let’s look a little bit more at what constitutes a valid batch block, particularly in the pre-agg phase. We’ll look at one additional rule that hasn’t been covered yet, and we’ll look at some common mistakes that can cause a pre-agg declaration to be invalid.
While pre-agg construction mostly works like regular dataflow code, by attaching one node at a time and always attempting to attach to the last attached node, you saw how joins take effect when a node can’t attach. Because of the importance of var names for determining the meaning of joins, Rama disallows var shadowing in the pre-agg phase of batch blocks. So code like this will throw an exception when you try to run it:
Block.batchBlock(
  Block.each(Ops.IDENTITY, 1).out("*a")
       .each(Ops.INC, "*a").out("*a")
       .agg(Agg.sum("*a")).out("*sum"))
     .execute();
Because of the attempt to rebind the var "*a", the stack trace will contain the message Could not produce valid preagg configuration {:fields #{*a}, :reason {:shadowed #{*a}}.
The other major requirement of pre-agg code is all batch sources must combine to a single branch (through joins and merges). This "single branch rule" applies to all code in the pre-agg, so if you leave any stray branches in your code you’ll get an exception. For example:
Block.batchBlock(
  Block.each((OutputCollector collector) -> {
              collector.emitStream("streamA", 2);
              collector.emit(1);
            }).outStream("streamA", "streamAAnchor", "*v")
              .out("*v")
       .agg(Agg.sum("*v")).out("*sum"))
     .execute();
There are two branches at the end of the pre-agg phase here – one for "streamA", and one for the default output stream. The exception in this case will contain the message Cannot add root to a non-empty DAG (we have it on our list to improve that exception message!). One way to get this code to execute without exception is to unify those two branches.
Lastly, let’s take a look at what happens when you have multiple batch sources that can’t join together because they have no common vars. Here’s an example:
Block.batchBlock(
  Block.each(Ops.IDENTITY, 1).out("*a")

       .freshBatchSource()
       .each(Ops.IDENTITY, 2).out("*b"))
     .execute();
This preagg block contains two batch sources that can’t join because they don’t share any vars. Running this throws an exception with the message Expected single tail, found multiple - missing join fields? {:count 2, :vars #{*b *a}}.
Here’s a similar example:
Block.batchBlock(
  Block.each(Ops.IDENTITY, 1).out("*a")

       .freshBatchSource()
       .each(Ops.IDENTITY, 2).out("*b")

       .each(Ops.PRINTLN, "Vals:", "*a", "*b"))
     .execute();
In this case, the Ops.PRINTLN node can’t attach because there’s no valid joins to produce a scope with both "*a" and "*b". The exception in this case contains the message Could not produce valid preagg configuration {:fields #{*___ensure-output_2642 *b *a}, :reason [{:missing-input {:needed #{*b *a}, :found #{*b}}} :no-possible-joins].
Outer joins
Next, let’s take look at how outer joins are specified in Rama. Like the inner joins you saw before, they are defined very differently than a language like SQL.
Let’s review what an outer join looks like between two tables. Suppose you had the following tables:
| User ID | Name | Location ID |
|---|---|---|
1 |
James Cagney |
3 |
2 |
Bette Davis |
2 |
3 |
Jack Lemmon |
null |
| Location ID | Location name |
|---|---|
1 |
Tokyo |
2 |
Lowell |
3 |
New York City |
If you did a left outer join between the People and Location tables on Location ID, you would end up with these results:
| User ID | Name | Location ID | Location name |
|---|---|---|---|
1 |
James Cagney |
3 |
New York City |
2 |
Bette Davis |
2 |
Lowell |
3 |
Jack Lemmon |
null |
null |
Every row from the non-outer table exists in the output, and when the corresponding key does not exist in the outer table the fields are set to null.
Another way to think of an outer join is as a join against an infinite table. The outer table contains a row for every key not defined in it with all other fields set to null. So you could think of this outer join as an inner join between a regular table and an infinite table. The infinite version of the Location table looks something like:
| Location ID | Location name |
|---|---|
1 |
Tokyo |
2 |
Lowell |
3 |
New York City |
null |
null |
4 |
null |
5 |
null |
6 |
null |
7 |
null |
… |
… |
Every possible key exists in the infinite table, not just numbers and null. An inner join between these two tables produces the correct result because the keys that end up in the final result are only the keys in the non-infinite table.
In Rama, you specify outer joins using this more abstract concept. An infinite batch source in Rama is called an "unground source", while a regular batch source is called a "ground source". Unground sources are specified using special var names. Let’s look at an example:
List source1 = Arrays.asList(Arrays.asList("a", 1),
                             Arrays.asList("b", 2),
                             Arrays.asList("c", 3));
List source2 = Arrays.asList(Arrays.asList("a", 10),
                             Arrays.asList("b", 20),
                             Arrays.asList("d", 40));
Block.batchBlock(
  Block.each(Ops.EXPLODE, source1).out("*tuple1")
       .each(Ops.EXPAND, "*tuple1").out("*k", "*v1")

       .freshBatchSource()
       .each(Ops.EXPLODE, source2).out("*___tuple2")
       .each(Ops.EXPAND, "*___tuple2").out("*k", "**v2")

       .each(Ops.PRINTLN, "Joined:", "*k", "*v1", "**v2"))
     .execute();
There are two special kinds of vars in this code: "unground vars" which begin with "**", and "delayed unground vars" which begin with "*___". These var names only have special meaning in batch blocks – in regular dataflow code they’re interpreted like any other var.
As soon as you emit an unground var in a batch source, that batch source becomes unground. Because it’s now infinite, Rama disallows you from adding any more nodes to that batch source. The next operation with that batch source must be a join.
When an unground source is involved in a join, it must join against all of its ground vars. However, because you may need intermediate vars in order to fully construct the unground source, Rama has a concept called "delayed unground vars". A delayed unground var is considered ground until an unground var is introduced into the batch source. At that point it becomes unground. In this example a delayed unground var is used for the intermediate tuple from which the rest of the vars are extracted.
In the example, the first batch source is ground and the second is unground. The Ops.PRINTLN line triggers a join between the two sources. The join key is the var "*k" since that’s the only var they have in common. Running this example prints:
Joined: a 1 10
Joined: b 2 20
Joined: c 3 nil
On a practical level, your mind doesn’t need to go into an infinite dimension every time you want to do an outer join in Rama. Another way to think through it is "I want all the data from this source, and I want all the non-key fields from this other source to be null after the join". Then you set the ground and unground vars appropriately.
Rama can also perform full outer joins between batch sources. They’re specified by having unground vars on every batch source. In this case, the resulting keys in the output will be the union of the keys across all batch sources.
materialize
In some microbatch topologies you may want to re-use the results of a batch block in subsequent batch blocks. Rama lets you accomplish this by materializing a temporary PState with those results that’s only valid during that microbatch attempt. This temporary PState is fully in-memory and cleared in between microbatches.
One way to materialize a temporary PState is with the materialize method on Block. This method is only valid inside batch blocks in microbatch topologies. The kinds of microbatch topologies that would use temporary PStates tend to be fairly complicated, so we’ll look at a contrived example for the purposes of demonstration:
public class MaterializeModule implements RamaModule {
  @Override
  public void define(Setup setup, Topologies topologies) {
    setup.declareDepot("*depot", Depot.random());

    MicrobatchTopology mb = topologies.microbatch("mb");
    mb.pstate("$$p1", Long.class).global().initialValue(0L);
    mb.pstate("$$p2", Long.class).global().initialValue(0L);
    mb.source("*depot").out("*microbatch")
      .batchBlock(
        Block.explodeMicrobatch("*microbatch").out("*v")
             .each(Ops.INC, "*v").out("*v2")
             .materialize("*v", "*v2").out("$$nums"))
      .batchBlock(
        Block.explodeMaterialized("$$nums").out("*v1", "*v2")
             .globalPartition()
             .agg("$$p1", Agg.sum("*v1")))
      .batchBlock(
        Block.explodeMaterialized("$$nums").out("*v1", "*v2")
             .globalPartition()
             .agg("$$p2", Agg.sum("*v2")));
  }

  public static void main(String[] args) throws Exception {
    try(InProcessCluster cluster = InProcessCluster.create()) {
      RamaModule module = new MaterializeModule();
      cluster.launchModule(module, new LaunchConfig(2, 2));
      String moduleName = module.getClass().getName();

      Depot depot = cluster.clusterDepot(moduleName, "*depot");
      PState p1 = cluster.clusterPState(moduleName, "$$p1");
      PState p2 = cluster.clusterPState(moduleName, "$$p2");

      depot.append(1);
      depot.append(2);
      depot.append(3);

      cluster.waitForMicrobatchProcessedCount(moduleName, "mb", 3);
      System.out.println("Vals: " + p1.selectOne(Path.stay()) + " " + p2.selectOne(Path.stay()));
    }
  }
}
In the first batch block, a temporary PState "$$nums" is materialized containing two fields. This is a pre-agg only batch block, but you can also call materialize from the post-agg. Notice that "$$nums" is not declared anywhere. "$$nums" is then consumed using explodeMaterialized in the subsequent two batch blocks. Since batch blocks finish completely before the code after a batch block executes, "$$nums" is guaranteed to be fully materialized when the next batch block starts.
A PState created with materialize is consumed through explodeMaterialized. Just like explodeMicrobatch, explodeMaterialized emits all data for the PState across all tasks. It emits the exact same number of fields as were given to it in the materialize call.
Running this example prints:
Vals: 6 9You can materialize as many temporary PStates as you like inside a microbatch topology. Besides materialize, you can also create temporary PStates from the output of aggregators in batch blocks. This is covered on the Aggregators page.
Macros
Rama being a pure Java API makes it very amenable to reusing code. You’ve seen how to define custom RamaOperation and RamaFunction classes, and in this section we’ll look at how dynamic chunks of dataflow code can be defined and reused via a facility called "macros".
Macros aren’t strictly necessary for this kind of code reuse, but they make the code much more elegant. So let’s start by taking a look at how you would do this without macros. You’ll see the issues you have to deal with, and later you’ll see how macros make those issues much easier to handle.
The first example we’ll use to explore these ideas comes from a utility in the open-source project rama-helpers called extractJavaFields. We’ll start by building the utility extractJavaFieldsNonMacro that implements this functionality without macros. This utility will be a static Java function used like so:
StreamTopology s = topologies.stream("s");
Block.Impl b = s.source("*depot").out("*data");
b = extractJavaFieldsNonMacro(b, "*data", "*id", "*name")
b.localTransform("$$names", Path.key("*id").termVal("*name"));
What extractJavaFieldsNonMacro does is add dataflow code to a Block that uses reflection to extract public fields from a Java object and bind them to vars of the same name. In this example, the fields id and name are extracted from the object in the var "*data" and bound to the vars "*id" and "*name".
extractJavaFieldsNonMacro will use the RamaFunction TopologyUtils.ExtractJavaField from rama-helpers which performs the actual reflection logic. Using this function manually looks like this:
StreamTopology s = topologies.stream("s");
s.source("*depot").out("*data")
 .each(new TopologyUtils.ExtractJavaField("id"), "*data").out("*id")
 .each(new TopologyUtils.ExtractJavaField("name"), "*data").out("*name")
 .localTransform("$$names", Path.key("*id").termVal("*name"));
extractJavaFieldsNonMacro makes the code much more concise. It needs to generate a call to that function for every field being extracted. Here’s the implementation:
public static Block extractJavaFieldsNonMacro(Block.Impl b, Object from, String... fieldVars) {
  for(String f: fieldVars) {
    String name = f.substring(1);
    b = b.each(new TopologyUtils.ExtractJavaField(name), from).out(f);
  }
  return b;
}
All this does is add a new each call for every desired field. It uses simple string manipulation to convert the output vars into the field names. This code is a great demonstration of the value of having a general-purpose langauge at your disposal when constructing dataflow code. Abstraction and composition are the foundations of software engineering and you should never sacrifice those.
What makes this method of dataflow abstraction problematic is the awkwardness of using it. You can see from the example usage how it breaks the builder pattern of constructing blocks. Rather than be a method you can call on an existing block, you instead have to pass the block as an argument and continue attaching dataflow code from the return. What you really want is something like this pseudocode:
StreamTopology s = topologies.stream("s");
s.source("*depot").out("*data")
 .extractJavaFieldsNonMacro("*data", "*id", "*name")
 .localTransform("$$names", Path.key("*id").termVal("*name"));
This isn’t possible since you can’t add methods to Block, but macros will get you very close to this level of elegance.
Before we get to macros, let’s take a look at one more example from rama-helpers called ModuleUniqueIdPState. This provides a utility for generating 8-byte identifiers unique across all tasks of a module. You would use this when you want more efficient unique IDs than 16-byte UUIDs. It works by combining a counter on the task with the task’s ID into an 8-byte value. Underneath the hood, a PState is used to track the counter.
Once again, we’ll make a version of ModuleUniqueIdPState without macros called NonMacroModuleUniqueIdPState. You’ll see another issue you must consider while generating chunks of dataflow code. First, here’s an example of usage:
StreamTopology s = topologies.stream("s");
NonMacroModuleUniqueIdPState id = new NonMacroModuleUniqueIdPState("$$id");
id.declarePState(s);
Block.Impl b = s.source("*depot");
b = id.genId(b, "*id");
b.each(Ops.PRINTLN, "New ID:", "*id");
NonMacroModuleUniqueIdPState provides a function genId which inserts dataflow code that interacts with a PState to generate unique IDs. It also has the function declarePState to create the PState it needs.
Here’s the implementation of NonMacroModuleUniqueIdPState:
public class NonMacroModuleUniqueIdPState {
  private final String _pstateName;

  public NonMacroModuleUniqueIdPState(String pstateName) {
    _pstateName = pstateName;
  }

  public void declarePState(ETLTopologyBase topology) {
    topology.pstate(_pstateName, Long.class).initialValue(0L);
  }

  private static long generateId(Long id1, Integer taskId) {
    return (((long) taskId) << 42) | id1;
  }

  public Block.Impl genId(Block.Impl b, String outVar) {
    String counterVar = Helpers.genVar("counter");
    String taskIdVar = Helpers.genVar("taskId");
    b = b.localSelect(_pstateName, Path.stay()).out(counterVar)
         .localTransform(_pstateName, Path.term(Ops.PLUS_LONG, 1))
         .each(Ops.CURRENT_TASK_ID).out(taskIdVar)
         .each(NonMacroModuleUniqueIdPState::generateId, counterVar, taskIdVar).out(outVar);
    return b;
  }
}
The strategy taken here to generate unique IDs is to combine an incrementing counter with the ID of the current task. In the 64 bits of output available, 22 bits are used for the task ID and 42 bits for the counter. This means NonMacroModuleUniqueIdPState can work on modules with up to 4.1M tasks and generate 4.3T unique IDs per task.
Let’s turn our focus to the genId implementation which is doing something which may seem strange. The implementation needs intermediate variables to capture the current counter and the current task ID. Those are combined with generateId to produce the output. Rather than just declare variables like "*counter" and "*currentTaskId", this is using a utility Helpers.genVar. There’s a very important reason for this.
Let’s see what goes wrong if you were to hardcode "*counter" and "*currentTaskId" for those intermediate variables. Suppose you used genId in code like this:
StreamTopology s = topologies.stream("s");
NonMacroModuleUniqueIdPState id = new NonMacroModuleUniqueIdPState("$$id");
id.declarePState(s);
Block.Impl b = s.source("*depot").out("*counter")
b = id.genId(b, "*newId");
b.each(Ops.PRINTLN, "Vals:", "*counter", "*newId");
Since the calls to NonMacroModuleUniqueIdPState are just adding dataflow code, this code is equivalent to:
StreamTopology s = topologies.stream("s");
s.pstate("$$id", Long.class).initialValue(0L);
s.source("*depot").out("*counter")
 .localSelect("$$id"), Path.stay()).out("*counter")
 .localTransform("$$id", Path.term(Ops.PLUS_LONG, 1))
 .each(Ops.CURRENT_TASK_ID).out("*currentTaskId")
 .each(NonMacroModuleUniqueIdPState::generateId, "*counter", "*currentTaskId").out("*newId")
 .each(Ops.PRINTLN, "Vals:", "*counter", "*newId");
With such an implementation of genId, the variable "*counter" is being inadvertently shadowed as a side effect! So rather than the Ops.PRINTLN statement printing the value that came off the depot, as the code looks to be doing, it’s instead printing an intermediate value from the genId implementation. A side effect like this is extremely confusing and hard to debug.
The Helpers.genVar function gets around this problem. Every call to Helpers.genVar produces a unique var. Since it’s unique, there’s no possibility of it inadvertently shadowing other vars in the context where the code is inserted. The argument to Helpers.genVar helps with debugging if you were to have a problem with your implementation – an error like "*___counter_1234 not found" is a lot more helpful than the error "*___1234 not found". Even with the same argument, multiple calls to Helpers.genVar produce unique vars. There’s also Helpers.genPStateVar for generating vars beginning with "$$".
Now let’s see how to fix the awkwardness of this method of code generation with Rama’s macros. Let’s go back to extractJavaFieldsNonMacro and see how to do it as a macro:
public static Block extractJavaFieldsMacroFlawed(Object from, String... fieldVars) {
  Block.Impl ret = Block.create();
  for(String f: fieldVars) {
    String name = f.substring(1);
    ret = ret.each(new TopologyUtils.ExtractJavaField(name), from).out(f);
  }
  return ret;
}
You can tell from the name this isn’t perfect yet. We’re getting close, however. Here’s how this is used:
StreamTopology s = topologies.stream("s");
s.source("*depot").out("*data")
 .macro(extractJavaFieldsMacroFlawed("*data", "*id", "*name"))
 .localTransform("$$names", Path.key("*id").termVal("*name"));
This is much nicer than before! It no longer breaks the builder pattern and reads much better. What macro does is simply expand the provided Block into its callsite, just like we were doing explicitly with the non-macro implementation. So this code expands to:
StreamTopology s = topologies.stream("s");
s.source("*depot").out("*data")
 .each(new TopologyUtils.ExtractJavaField("id"), "*data").out("*id")
 .each(new TopologyUtils.ExtractJavaField("name"), "*data").out("*name")
 .localTransform("$$names", Path.key("*id").termVal("*name"));
For usages like this – directly in topology code – extractJavaFieldsMacroFlawed works fantastic. Where it falls short is if you tried to use it in the implementation of another macro. For example, suppose you tried to use it in this macro:
public static Block extractCombinedNameMacroFlawed(Object from, String outVar) {
  return Block.macro(extractJavaFieldsMacroFlawed(from, "*firstName", "*lastName"))
              .each(Ops.TO_STRING, "*firstName", " ", "*lastName").out(outVar);
}
This is creating intermediate vars "*firstName" and "*lastName" that will inadvertently shadow other vars in the context where the macro is expanded. But we can’t generate vars for the outputs of extractJavaFieldsMacroFlawed because its implementation is reliant on the var names being of that specific form. extractJavaFieldsMacroFlawed lacks composability.
Fortunately, this is easy to fix. Here’s the implementation of extractJavaFieldsMacro which works perfectly for all scenarios:
public static Block extractJavaFieldsMacro(Object from, String... fieldVars) {
  Block.Impl ret = Block.create();
  for(String f: fieldVars) {
    String name;
    if(Helpers.isGeneratedVar(f)) name = Helpers.getGeneratedVarPrefix(f);
    else name = f.substring(1);
    ret = ret.each(new TopologyUtils.ExtractJavaField(name), from).out(f);
  }
  return ret;
}
To make the macro composable we need to explicitly handle the case where the output fields are generated vars. Helpers.isGeneratedVar tells you if a var is generated, and Helpers.getGeneratedVarPrefix gets you the string that was provided to the call to Helpers.genVar. With this technique, here’s how to implement extractCombinedNameMacro that handles intermediate vars correctly:
public static Block extractCombinedNameMacro(Object from, String outVar) {
  String firstNameVar = Helpers.genVar("firstName");
  String lastNameVar = Helpers.genVar("lastName");
  return Block.macro(extractJavaFieldsMacro(from, firstNameVar, lastNameVar))
              .each(Ops.TO_STRING, firstNameVar, " ", lastNameVar).out(outVar);
}
Just like before this extracts the fields firstName and lastName, but it does so with unique intermediate vars.
extractJavaFieldsMacro is unusual for the provided var names having semantic meaning for what fields should be extracted. The vast majority of macros you write won’t need to handle generated vars explicitly like this. The main rule to remember to keep your macros safe and composable is to use Helpers.genVar for all intermediate variables.
That’s everything you need to know to make use of macros. They’re simple to write and use, and they unlock a great deal of power. With macros you can compose anything in the dataflow API to extract reusable functionality: function invocations, partitioners, PState interactions, etc. For more examples of the kinds of things macros can do, check out the rest of the rama-helpers project.
Summary
On this page, you learned the remainder of Rama’s dataflow API. You’ve seen how batch blocks and macros greatly expand how you can approach building applications with Rama. Along the way, you saw how important it is for your dataflow API to be a library in a general purpose language so you can apply abstraction and composition techniques to your dataflow code.
With the material on this page, you now have all the knowledge you need to understand the implementation of our Twitter-scale Mastodon implementation. That’s a great project to study to learn how to apply Rama towards a real application at scale.