Operating Rama clusters
This page covers everything you need to know to set up Rama clusters and manage module deployments. Modules aren’t static programs – their code evolves and their performance needs change over time. Rama provides first-class mechanisms to manage the evolution of modules in a robust and easy-to-use way.
Note that for development you don’t need any of the information on this page and can just use InProcessCluster by including Rama as a Maven dependency in your project.
On this page you’ll learn:
-
How to set up a Rama cluster
-
Using the Rama CLI
-
Accessing depots, PStates, and query topologies from remote Java clients
-
Launching modules
-
Isolation scheduler vs. dev scheduler
-
Configuring modules
-
Updating modules to a new code version
-
Scaling modules
-
Activating self-monitoring
-
Using the Cluster UI
-
Decommissioning a node that has gone bad
-
Upgrading a Rama cluster to a new version
Setting up a Rama cluster
The first step to setting up a Rama cluster is creating a Zookeeper cluster. Zookeeper is used by Rama to store cluster metadata such as which nodes should be running which module workers and replication coordination information (e.g. leadership election). Rama makes use of Zookeeper internally through an abstraction called the "Metastore". The deployment instructions for Zookeeper can be found here.
Next, download a Rama release. When unpacking a release you’ll see contents like this:
lib/
log4j2.properties
logs/
rama
rama.jar
rama.yaml
rama.jar and lib/ contain the Rama implementation and all dependency jars. If there are other libraries you wish to be on the classpath of every module, you can add those to lib/. log4j2.properties contains Log4j configuration for all Rama daemons and module workers. logs/ is where all log files will go. rama implements the Rama CLI, described below. Lastly, rama.yaml is where you’ll configure Rama’s daemons.
A Rama release is used to launch the daemons comprising a Rama cluster as well as on clients issuing the Rama CLI to launch, update, or scale modules. It’s critical that clients use the same Rama release version as used by the cluster.
Rama daemons and clients can be run on UNIX-based machines, including Linux and macOS. Java 8, 11, 17, or 21 should be installed. You will also need Python 3 installed on the machines.
The next step is setting up the Conductor node. The Rama CLI communicates with the Conductor to launch, update, and scale modules. The Conductor also serves a web-based Cluster UI showing status and telemetry information for modules.
First, unpack the Rama release on the machine. Then edit the rama.yaml with the following configurations:
-
zookeeper.servers: list of hostnames for all Zookeeper nodes (required) -
local.dir: path to directory for Conductor to store local state, primarily jars for modules. Defaults tolocal-rama-data/where the release is unpacked. (optional but recommended) -
license.dir: path to the directory to store Rama licenses (optional) -
zookeeper.port: configured port for Zookeeper nodes, defaults to2000(optional) -
zookeeper.root: root Zookeeper node for Rama to keep cluster metadata, defaults torama(optional) -
conductor.port: port exposed by Conductor for cluster operation, defaults to 1973 (optional) -
cluster.ui.port: port serving the Cluster UI, defaults to 8888 (optional) -
conductor.child.opts: options string to JVM process for Conductor, defaults to"-Xmx1024m"(optional) -
cluster.metadata: string to display at top of Cluster UI (optional)
Here’s an example Conductor configuration:
zookeeper.servers:
  - "1.2.3.4"
  - "5.6.7.8"
local.dir: "/data/rama"
Other available Conductor configs can be found on this page.
Next, launch the Conductor by running ./rama conductor from the unpacked release. For production you should run this command using a process supervision tool like systemd or monit.
The last step to setting up a Rama cluster is configuring Worker nodes. Each Worker node runs a daemon called the Supervisor which watches for changes to cluster state and starts/stops Worker processes as dictated by Conductor.
Launching Supervisors is similar to launching the Conductor. First, unpack the Rama release on the machine. Then edit the rama.yaml with the following configurations:
-
conductor.host: hostname of conductor (required) -
zookeeper.servers: list of hostnames for all Zookeeper nodes (required) -
local.dir: path to directory for local state for Supervisor and module workers. Defaults tolocal-rama-data/where the release is unpacked. (optional but recommended) -
zookeeper.port: configured port for Zookeeper nodes, defaults to2000(optional) -
zookeeper.root: root Zookeeper node for Rama to keep cluster metadata, defaults torama(optional) -
conductor.port: port exposed by Conductor for cluster operation, defaults to 1973 (optional) -
supervisor.child.opts: options string to JVM process for Supervisor, defaults to"-Xmx256m"(optional) -
supervisor.host: hostname reported by this Supervisor used by other nodes for network communication, defaults to result of calling InetAddress.getLocalHost (optional) -
supervisor.port.range: pair of numbers for range of ports to assign to launched workers, defaults to3000, 4000. Should be a large range to ensure Supervisor never runs out of ports to assign. (optional) -
supervisor.labels: a list of labels for the supervisor that can be targeted when deploying modules. See Heterogenous clusters for more details. (optional)
Here’s an example Supervisor configuration:
zookeeper.servers:
  - "1.2.3.4"
  - "5.6.7.8"
conductor.host: "9.10.11.12"
local.dir: "/data/rama"
supervisor.port.range:
  - 2500
  - 3500
Other available Supervisor configs can be found on this page.
Next, launch the Supervisor by running ./rama supervisor from the unpacked release. Like the Conductor, for production you should run this command using a process supervision tool like systemd or monit. For the Supervisor it’s best that you configure the supervision tool not to kill subprocesses if the Supervisor process dies. Although there’s no reason to expect the Supervisor to crash, if it does it’s been designed to have no affect on running workers and there’s no reason to bring down workers if their Supervisor crashes.
It’s also recommended to configure worker nodes with swap space. Module update launches new workers colocated with the previous module instance’s workers as it hands off responsibility between the two module versions. So each worker node either needs enough memory to run workers for both module versions, or it needs swap space to handle the extra temporary memory needs.
Adding a license
Rama has an embedded free license that allows clusters to be run up to two nodes. The node limit is for Supervisors only, and Conductor/Zookeeper do not count towards that limit. A paid license is required for larger clusters or for access to enterprise features. A license is valid between a start date and an end date and specifies the maximum number of nodes that can be utilized for running modules. A license does not restrict how many supervisors can be launched, but it does restrict how many supervisors will be assigned modules to run.
See the pricing page for more info on purchasing a license.
Licenses can be viewed in the Cluster UI "Conductor" tab, like so:
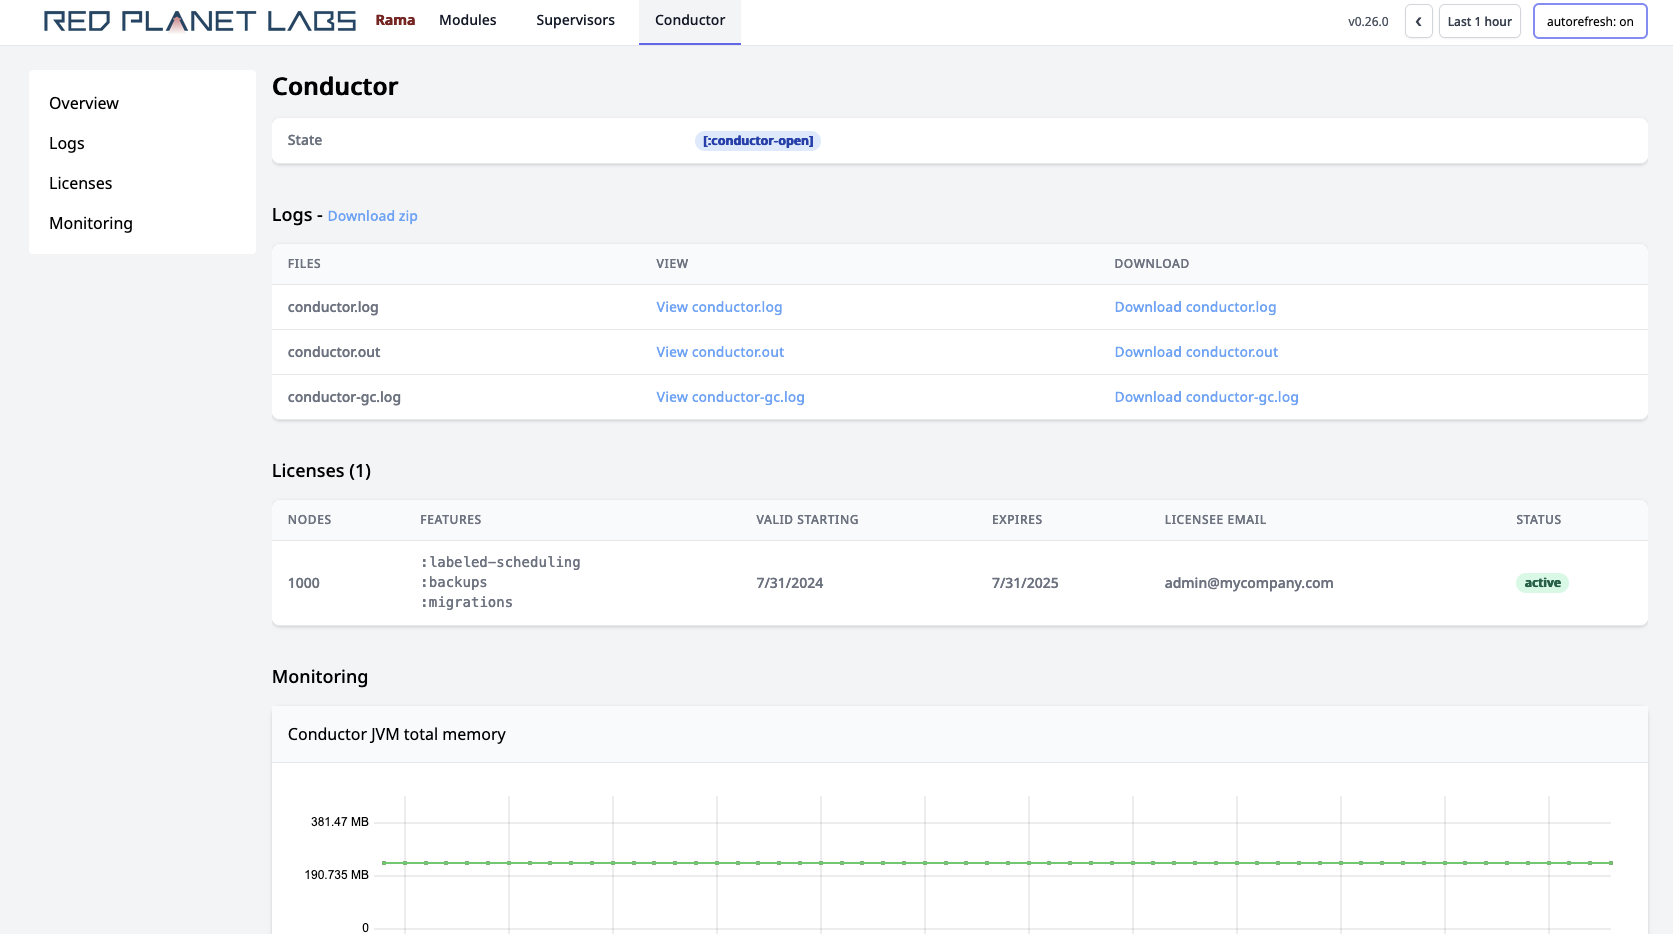
A license can either be "active", "expired", "superseded", or "future". The number of allowed nodes is always the maximum number of nodes specified across all valid licenses, and this is marked as the "active" license. A "superseded" license is a valid license for which there exists another valid license allowing more nodes or another valid license allowing the same number of nodes but expiring further in the future. An "expired" license has an end date in the past, and a "future" license has a start date in the future.
Licenses are installed on the Conductor and are managed with the Rama CLI commands upsertLicense and cleanupLicenses. These commands can only be run on the Conductor node.
To add a license, run upsertLicense with the full path to the license file like so:
./rama upsertLicense --licensePath /home/mycompany/mycompany-rama-license.ednTo remove any expired licenses, run cleanupLicenses like so:
./rama cleanupLicensesIf a license is expiring soon, you will see a banner on every Cluster UI page warning of that.
When a module is undergoing a transition, like a module update or scaling operation, only nodes running worker processes corresponding to the new module instance count towards the license limit.
When a cluster does not have a license permitting its current state, like if the only available license expires, the cluster will automatically shut down. All worker processes will stop, but no data will be lost. Once you add a valid license and restart the Conductor process, all the modules will restart and resume where they left off.
Logs
Logs for the Conductor, Supervisors, and Workers are kept in the logs/ directory in each unpacked release. The logging settings can be configured by editing log4j2.properties at the root of the unpacked release.
The logs should be one of the first places you look if you run into any issues. You can also add your own logging in your module code using the Logger class. These logs will go into the worker log files intermixed with the other logging Rama does.
You can also view all logs through the Cluster UI from the Conductor, Supervisor, or Worker pages.
Internal/external hostname configuration
In some environments, like AWS, there’s a distinction between "internal" and "external" hostnames. Internal hostnames are used within the cluster environment, while external hostnames are used outside that environment (like from a laptop). So that you can use the exact same rama.yaml file for all daemons and clients, Rama lets you configure separate internal and external hostnames for the "conductor.host" and "zookeeper.servers" configs. Of course, if you don’t care about using the same rama.yaml file for all daemons and clients, you won’t need this feature.
conductor.host and zookeeper.servers accept a map containing "internal" and "external" keys as an alternative to providing just a single hostname. Here’s an example:
conductor.host:
  internal: "1.2.3.4"
  external: "5.6.7.8"
zookeeper.servers:
  - internal: "9.10.11.12"
    external: "13.14.15.16"
  - internal: "17.18.19.20"
    external: "21.22.23.24"
Rama daemons use internal hostnames to communicate to each other and to Zookeeper. A Rama client can choose whether to use internal or external hostnames by how that client is created. RamaClusterManager.open uses external hostnames, and RamaClusterManager.openInternal uses internal hostnames.
Running single-node cluster
Rama is easy to set up on a single node by running Zookeeper, Conductor, and one Supervisor on the same node. This is a great way to start for low-scale applications, and it’s easy to scale up later by adding more nodes.
First, you should set up Zookeeper on the node. If you just want to experiment with a Rama cluster and are not intending it for production use, you can run a development Zookeeper server from the unpacked Rama release directory using the command ./rama devZookeeper. This is not suitable for production since it doesn’t set up some of the administration routines you need for long-term use. It’s purely a convenience for experimenting with a single-node cluster.
Next, you can run the Conductor and one Supervisor from the same unpacked release directory with ./rama conductor and ./rama supervisor. They can share the same rama.yaml file since they each use an independent sub-directory within local.dir.
Using the Rama CLI
The Rama CLI is used via the rama script at the root of an unpacked release. To use it outside a cluster, you simply configure conductor.host in the rama.yaml in the same directory. You must ensure the rama script you’re using is from the same release version as the cluster you configure with conductor.host.
The commands available in the CLI include:
-
rama cleanupLicenses: Removes expired licenses from Conductor. -
rama conductor: Launches a Conductor. -
rama confValue <configuration name>: Prints value configured for given config in this unpacked release. -
rama deploy …: Launches or updates a module. See the Launching modules and Updating modules sections below for required and optional arguments. -
rama destroy <moduleName> [--useInternalHostnames]: Destroys a module. Fails if there are any dependent modules. -
rama devZookeeper: Launches a Zookeeper server. Not for production use. -
rama licenseInfo: Prints out information about all installed licenses. -
rama moduleStatus <moduleName> [--useInternalHostnames]: Prints current status of a module. -
rama pauseTopology <moduleName> <topologyName> [--useInternalHostnames]: Pauses a microbatch topology in a module. -
rama resumeTopology <moduleName> <topologyName> [--useInternalHostnames]: Activates a microbatch topology in a module. -
rama runClj <namespace> <jarPath>+: Runs the given Clojure namespace with the Rama release andrama.yamlon the classpath. Accepts additional jars to include on classpath as additional arguments. -
rama runJava <class> <jarPath>+: Runs the given Java class with the Rama release andrama.yamlon the classpath. Accepts additional jars to include on classpath as additional arguments. -
rama scaleExecutors …: Scales a module up or down. See below for required and optional arguments. -
rama setOption <module,topology,pstate,depot> <moduleName> [<objectName>] <optionName> <valueJSON> [--useInternalHostnames]: Sets a module, topology, PState, or depot dynamic option to a new value.<objectName>parameter must be given for PState and depot options. -
rama shutdownCluster: Gracefully shuts down a Rama cluster by letting all in-flight processing complete and then terminating every worker process. Used as part of upgrading a Rama cluster to a new version. Can only be run from the Conductor node. -
rama supervisor: Launches a Supervisor. -
rama taskGroupsStatus <moduleName> <moduleInstanceId> [--useInternalHostnames]: Prints status of every task group in a module instance. -
rama upsertLicense --licensePath <path>: Adds a license to Conductor. -
rama disallowLeaders <supervisorId>: If possible, moves all leaders off of the given node. Only one node can be disallowed at a time. This is used for patch version upgrades of Rama clusters. -
rama allowLeaders <supervisorId>: Allows leaders again on the given supervisor. -
rama supportBundle [--maxLogSizePerNode <numGigabytes>] [--useInternalHostnames]: Produces a zipfile containing cluster logs and cluster metadata to help Red Planet Labs debug any issues.
Run rama help to see the full list of commands available.
The optional --useInternalHostnames flag on some of the commands causes the command to use internal hostnames when connecting to the Conductor, Zookeeper, supervisors, or workers.
Accessing depots, PStates, and query topologies from remote Java clients
On the depot, PState, and query topology pages, you saw how to use Java-based depot, PState, and query topology clients to programatically interact with modules on a Rama cluster. Let’s now take a look at how to get ahold of those clients.
Depot, PState, and query topology clients are retrieved using RamaClusterManager. A RamaClusterManager instance is told how to connect to a Rama cluster and then has methods to create the desired clients.
To create a RamaClusterManager, use the static methods open or openInternal. Both are exactly the same, except the former uses external hostnames and the latter uses internal hostnames. If you aren’t configuring separate internal and external hostnames in your rama.yaml files, it doesn’t matter which one you use.
The minimal information RamaClusterManager needs to know is the host and port of the Conductor node managing the cluster. The zero-arity versions of open and openInternal retrieve that configuration from the rama.yaml file on the classpath of the client.
There’s also a one-arity version of those methods that allow you to pass in those configs manually. These versions of the methods will still read in the rama.yaml file on the classpath if it exists, but the manual config will take precedence. Here’s an example of usage:
Map config = new HashMap();
config.put("conductor.host", "1.2.3.4");
RamaClusterManager manager = RamaClusterManager.open(config);
If you’re using any custom serializations, you would also configure those with the "custom.serializations" key. That’s described more in this section.
Launching modules
New modules are launched using the Rama CLI’s deploy command. Here’s an example of usage:
rama deploy \
--action launch \
--jar target/my-application.jar \
--module com.mycompany.MyModule \
--tasks 64 \
--threads 16 \
--workers 8 \
--replicationFactor 3
--action launch specifies this is a deploy of a new module as opposed to an update of an existing module. You’ll see the details of updating an existing module in the next section.
The --tasks flag specifies the number of tasks in the module. The number of tasks specified must be a power of two.
--threads specifies the number of task threads for the module, and --workers specifies the number of worker processes. These can be any positive number and do not have to be a power of two. Rama will spread tasks as evenly as possible across task threads, and it will spread task threads as evenly as possible across workers. In this process it also balances the number of tasks per worker as best as possible. The number of tasks must be greater than or equal to the number of threads, and the number of threads must be greater than or equal to the number of workers.
If you specify --threads and --workers as a power of two, then load will be perfectly distributed across all your workers. If not, then some workers will have higher loads than others. For example if you have 64 tasks, nine threads, and nine workers, then eight workers will have seven tasks and one worker will have eight tasks. That one worker will process about 14% more load than the other workers. It’s inevitable to eventually have skewed load like this in a module deployment since you’re likely to only increase the number of resources by a small amount when you scale (e.g. 25%). Note that the more tasks you have in your module, the less the skew will be. However, there’s overhead per task so you don’t want too many tasks. We recommend starting off with no more than 32 tasks per thread.
Unlike --tasks, --threads, and --workers, --replicationFactor is not a required flag. The default replication factor is one, but we recommend using a higher replication factor for fault-tolerance. The number of JVM processes that will exist for a module deployment is the replication factor multiplied by the number of workers specified. Correspondingly, the number of threads that will exist is the replication factor multiplied by the number of threads specified. Each task thread is duplicated by the amount of the replication factor, and two task thread replicas will never exist on the same node. In this example there will be 24 JVM processes deployed across the cluster.
The --jar flag specifies where the module definition exists, and --module specifies the class implementing the module. A module’s class is the same as the module’s name by default, but if the module definition overrides getModuleName they will be different. Most other commands in the Rama CLI take in the module name as input, not the module class.
If using the Clojure API, --module should refer to the namespace-qualified var defining the module, like com.mycompany/FooModule.
The jar you submit must contain your module definition as well as all libraries you’re using that aren’t already provided by Rama. We’ll show one way to build such a jar in the next section.
A module deploy can also target supervisors with a particular label, which is useful if the module has particular resource requirements. See Heterogenous clusters for more details.
Building an uberjar
To submit a module to Rama for either launch or update, you’ll need to build an uberjar. This is also sometimes referred to as "jar with dependencies".
Many tools have the capability to build jars like this. One plugin you can use with Maven is called maven-assembly-plugin. Here’s an example pom.xml to build an uberjar including rama-helpers as a dependency:
<?xml version="1.0" encoding="UTF-8"?>
<project xmlns="http://maven.apache.org/POM/4.0.0"
         xmlns:xsi="http://www.w3.org/2001/XMLSchema-instance"
         xsi:schemaLocation="http://maven.apache.org/POM/4.0.0 http://maven.apache.org/xsd/maven-4.0.0.xsd">
    <modelVersion>4.0.0</modelVersion>

    <groupId>com.mycompany</groupId>
    <artifactId>myapplication</artifactId>
    <version>1.0.0</version>

    <properties>
        <maven.compiler.source>8</maven.compiler.source>
        <maven.compiler.target>8</maven.compiler.target>
    </properties>

    <repositories>
      <repository>
        <id>nexus-releases</id>
        <url>https://nexus.redplanetlabs.com/repository/maven-public-releases</url>
      </repository>
    </repositories>

    <dependencies>
        <dependency>
            <groupId>com.rpl</groupId>
            <artifactId>rama</artifactId>
            <version>1.9.0</version>
            <scope>provided</scope>
        </dependency>
        <dependency>
            <groupId>com.rpl</groupId>
            <artifactId>rama-helpers</artifactId>
            <version>0.10.0</version>
        </dependency>
    </dependencies>

    <build>
        <finalName>myapplication</finalName>
        <plugins>
            <plugin>
                <groupId>org.apache.maven.plugins</groupId>
                <artifactId>maven-assembly-plugin</artifactId>
                <version>3.1.1</version>
                <configuration>
                    <descriptorRefs>
                        <descriptorRef>jar-with-dependencies</descriptorRef>
                    </descriptorRefs>
                </configuration>
                <executions>
                    <execution>
                        <id>make-assembly</id>
                        <phase>package</phase>
                        <goals>
                            <goal>single</goal>
                        </goals>
                    </execution>
                </executions>
            </plugin>
        </plugins>
    </build>
</project>
Then, to build an uberjar you simply run mvn package. The uberjar for this example will be located at target/myapplication-jar-with-dependencies.jar.
Critical to this configuration is setting the scope of the rama dependency to provided. This excludes Rama from being included in the uberjar, which could blow up the size of the uberjar by over 100x.
For details on accessing the Red Planet Labs Maven repository, see this page.
Worker configurations and dynamic options
Rama exposes a number of knobs to tweak the behavior of workers. These are split into "configurations", which are values that can only be set on module launch or update, and "dynamic options", which are values that can be modified at any time and take effect nearly instantly. Dynamic options are usually modified through the Cluster UI.
The full list of worker configurations is listed here. The two worker configurations that are frequently relevant are:
-
worker.child.opts: options string to JVM process for Worker processes for this module instance, commonly used to configure memory and GC. Defaults to"-Xmx4096m". -
custom.serializations: list of custom serializations to configure for this module.
Worker configurations are set as part of the rama deploy command with the flag --configOverrides. The flag accepts a path to a YAML file containing the configurations. For example, you could use the flag --configOverrides overrides.yaml and have a file in the same directory overrides.yaml with the following contents:
worker.child.opts: "-Xmx8192m"
custom.serializations:
  - "com.rpl.myapp.serialization.MySerialization"
  - "com.rpl.myapp.serialization.MyOtherSerialization"
Worker configurations are set at the module instance level. So if you want the same configurations to apply to future iterations of the module, you have to specify them with each module update. Module updates are described fully below.
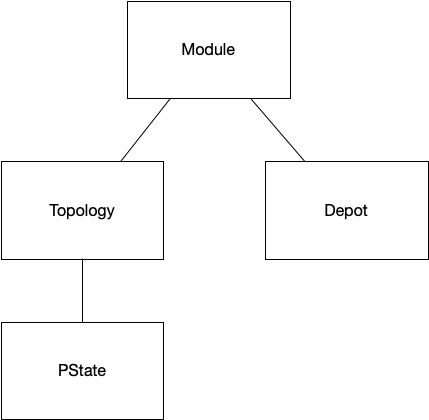
Dynamic options, on the other hand, are set at the module level. So they apply to the current module instance as well as future instances. There are four categories of dynamic options: module, topology, depot, and PState. They are arranged in the following hierarchy:
Kind of like CSS, a dynamic option can be set at any level at or above its category. For example, a depot option can be set for a particular depot or for the module as a whole, but a module option can only be set at the module level. The dynamic option value used is the most specific one relevant towards a particular context. For example, a depot "*myDepot" looking for the value for the depot option depot.max.fetch would first see if that option is set for "*myDepot". If not, it would check if that option is set for the module. If not, it uses the default value for the option.
Besides modifying dynamic options in the Cluster UI, dynamic options can also be set on launch with the flags --moduleOptions, --topologyOptions, --depotOptions, and --pstateOptions. The syntax for module options is {dynamic option}={value};{dynamic option}={value};…, and the syntax for the other options is {entity},{dynamic option}={value};{entity},{dynamic option}={value};…. For example, here’s a module launch command that sets some dynamic options for each level:
rama deploy \
--action launch \
--jar target/my-application.jar \
--module com.mycompany.MyModule \
--tasks 128 \
--threads 32 \
--workers 8 \
--replicationFactor 2 \
--moduleOptions 'replication.streaming.timeout.millis=20000;pstate.batch.buffer.limit=10' \
--topologyOptions 'myTopology,topology.combiner.limit=99' \
--depotOptions '*depot,depot.max.fetch=251' \
--pstateOptions '$$mb,pstate.reactivity.queue.limit=499;$$stream,pstate.reactivity.queue.limit=89'
Setting dynamic options on launch like this has them take effect from the moment the worker processes start.
Isolation scheduler
By default Rama spreads module workers evenly across the cluster. When it runs out of empty nodes, it will assign new workers to nodes alongside workers from other modules.
The internal routine for assigning workers to nodes is called a "scheduler", and the default one is called the "dev scheduler". The dev scheduler is convenient for development, but we don’t recommend using it for a production cluster. Modules being deployed to the same machines will compete for resources and make it hard to plan for how many resources are needed.
A Rama cluster can be configured with another scheduler called the "isolation scheduler". With this scheduler you configure how many nodes should be assigned to a module, and Rama will dedicate those nodes to that module. Modules are never deployed on the same nodes as any other module.
Unlike the other parallelism configurations for a module (tasks, threads, workers), the number of nodes for a module is configured in the Conductor’s rama.yaml file. Since a Rama cluster is a shared environment for running many independent applications, it’s important users consider carefully how many resources they need rather than just use all the resources available. Configuring the number of nodes for a module in the Conductor’s rama.yaml allows the operator of a cluster (the person or team responsible for the Conductor rama.yaml) to make sure the users of a cluster are efficient with resource usage.
Here’s an example of configuring the isolation scheduler:
conductor.assignment.mode:
  type: isolation
  modules:
    com.mycompany.Module1: 4
    com.mycompany.AnotherModule: 8
    com.mycompany.Module2: 54
The type key for conductor.assignment.mode can be isolation or dev. modules is specific to isolation and sets how many nodes to allocate to each of those module names. The Conductor must be restarted whenever these configurations are changed in order to pick up the changes (we have it on our roadmap to make this more dynamic).
When the isolation scheduler is configured, only modules listed under modules are allowed to be launched. Trying to deploy an unlisted module will get an exception. Likewise, if you try to deploy a listed module but the cluster doesn’t have enough free nodes for the isolation settings, the deploy will get an exception. On deploy of a configured module Rama will evenly spread out the workers/tasks/threads across its dedicated nodes.
A cluster currently configured with the dev scheduler can be transitioned to one using the isolation scheduler. When the Conductor’s rama.yaml is changed and the Conductor process restarted, no currently running modules will be affected. The isolation settings will apply to all future module launches and updates. So if a module is currently running on nodes shared with other modules, when you update that module it will be transferred to isolated nodes according to the configuration. The easiest way to transition modules in this scenario onto isolated nodes is to run a scaling command with no changes to threads/workers.
The isolation scheduler can also be used to target particular supervisor labels for modules. See Heterogenous clusters for more details.
At a high level, we recommend having one cluster for development and one cluster for production. The development cluster should use the default dev scheduler, and the production cluster should use the isolation scheduler.
Updating modules
A module currently running on a Rama cluster can be updated to a new version with the rama deploy command. Here’s an example of usage:
rama deploy \
  --action update \
  --jar myapplication-1.2.1.jar \
  --module 'com.mycompany.MyModule' \
  --configOverrides overrides.yaml
Whereas a module launch uses the launch action, a module update uses the update action. Like module launch, the --jar and --module flags specify the location of the module code and the module class to deploy. Parallelism settings (tasks, threads, workers) are not specified on module update since the new version of the module will use the same settings as the old module. However, any config overrides from a previous module deploy are not inherited. So those must be specified with each module update (e.g. custom serializations, worker JVM settings). The same also holds for a targeted supervisor label if the module has one.
A module update can perform any change to a module: updating topology code, adding new topologies, removing topologies, adding new PStates/depots, or removing PStates/depots. Existing PStates can also be migrated to a new schema. The deploy will validate the changes you’re making are valid: for example, if you try to remove a PState or depot that’s currently depended on by another module, the update will not go through.
The naming of depots and PStates in a module definition determine what carries over to the new module instance. Any depot or PState defined in the old module that’s not defined in the new module is considered destroyed. There’s currently no way to rename a depot or PState in a module update.
Because removing a PState or depot is destructive – Rama will delete all partitions from the filesystems of worker nodes – Rama requires you to explicitly specify objects being deleted as part of an update command. Here’s an example:
rama deploy \
  --action update \
  --jar myapplication-1.2.1.jar \
  --module 'com.mycompany.MyModule' \
  --configOverrides overrides.yaml \
  --objectsToDelete '$$p,*someDepot,$$anotherPState'
The specified --objectsToDelete must match exactly the objects being removed from the module or the update will throw an exception.
A module update is a highly coordinated operation to transition from one module instance to the next. In general, it works by launching the worker processes for the updated module instance on the same machines as the old module instance. It then gracefully transitions data and read/write responsibilities between the two instances in order to minimize downtime.
PState clients have zero downtime during the transition and will automatically retarget queries to the new module instance when it’s ready. This includes regular queries as well as reactive queries. Existing reactive queries will automatically perform a resync to the new instance. Depot appends may have some downtime where appends are buffered clientside while waiting for the new instance to be ready to accept appends. Likewise, stream and microbatch processing may be offline for a brief time during the transition. The downtime depends on the number of PStates and size of the individual PStates that are being transitioned, and can be anywhere from two seconds to thirty seconds (we have it on our roadmap to implement zero-downtime module update for appends and processing as well).
The one case where module update doesn’t deploy the new worker processes on the same machines as the old module instance is when transitioning from the dev scheduler to the isolation scheduler. In this case, it may be forced to relocate workers in order to achieve isolation. There’s no difference in semantics and all data will be transitioned to the new machines.
During a module update, you’ll see a variety of statuses for the module in the Cluster UI. You’ll see states like [:updating-next-assigned], [:updating-prepare-handover], and many others. These are intermediate states as the Conductor shepherds along the update process to perform the graceful transition. When it finishes the old module instance will be destroyed and the module status will go back to [:running].
Scaling modules
The Rama CLI provides the command rama scaleExecutors to change the number of workers, number of threads, or replication factor of a module. It can be used to increase or decrease any of these values.
Here’s an example of using this command:
rama scaleExecutors \
--module com.mycompany.MyModule \
--threads 90 \
--workers 30 \
--replicationFactor 3
Unlike the rama deploy command, --module refers to the module name and not the module class. The rest of the flags specify the new values for the number of threads, number of workers, and replication factor.
--threads, --workers, and --replicationFactor are all optional. If unspecified, the value from the current module instance will be used. You can even run rama scaleExecutors without specifying any of these flags (called "no-op scaling") which is useful when transitioning a cluster from the dev scheduler to the isolation scheduler.
All other aspects about a module are preserved when scaling, particularly the module instance config. So whereas with a module update you must specify the module instance config each time, with scaling it carries over to the new module instance. This is because a module update could be changing or deleting configs, whereas a scaling operation doesn’t change the module itself.
Scaling takes longer to complete than module update because Rama needs to copy data around to move tasks to new nodes. The scaling operation will still colocate the new module instance as much as possible with the old module instance to minimize this copying, but some copying will be necessary.
Scaling tips
A few of the metrics in the Cluster UI can help you determine when to scale. The first is the "Task groups load" metric, which tells you what percentage of time on each task thread is spent executing events versus waiting for events to arrive. Here’s an example:
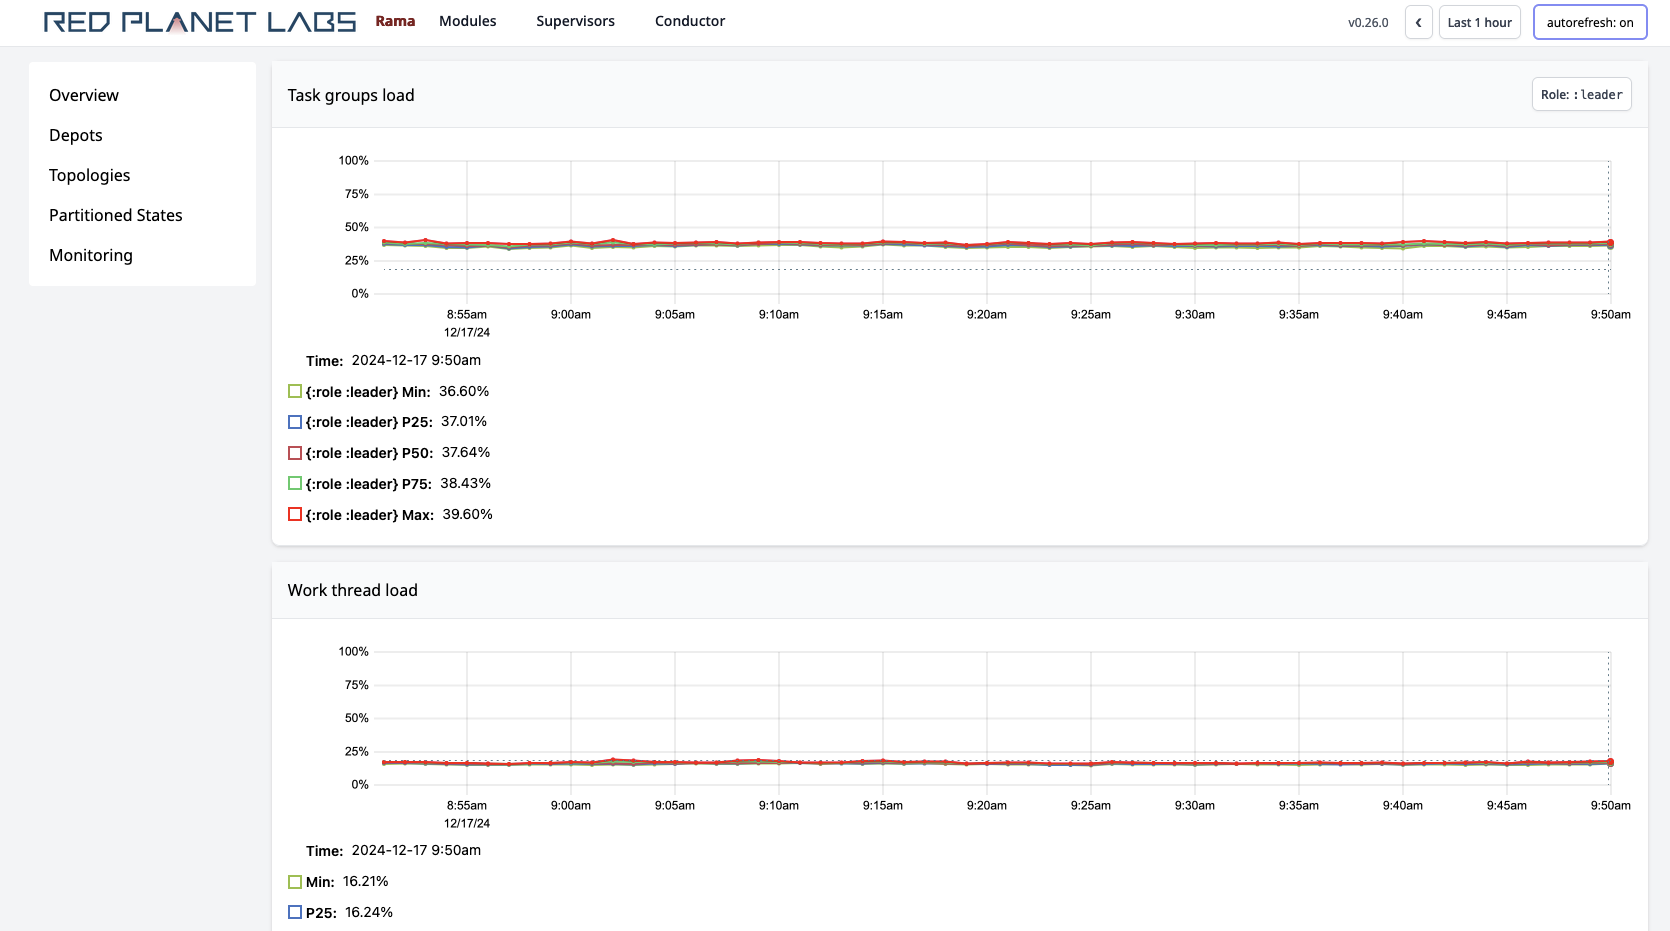
As a rule of thumb, you want to keep task group load below 70% for all task threads in order to have room to handle variance in load. Additionally, task group load doesn’t tell the full picture since there are other threads that Rama runs that can be using up CPU resources. Other processes on the machine can also use up CPU. So if your task group load is 65%, it’s possible the other 35% of the load on that CPU is taken up by other threads/processes. In this case you would need to scale soon.
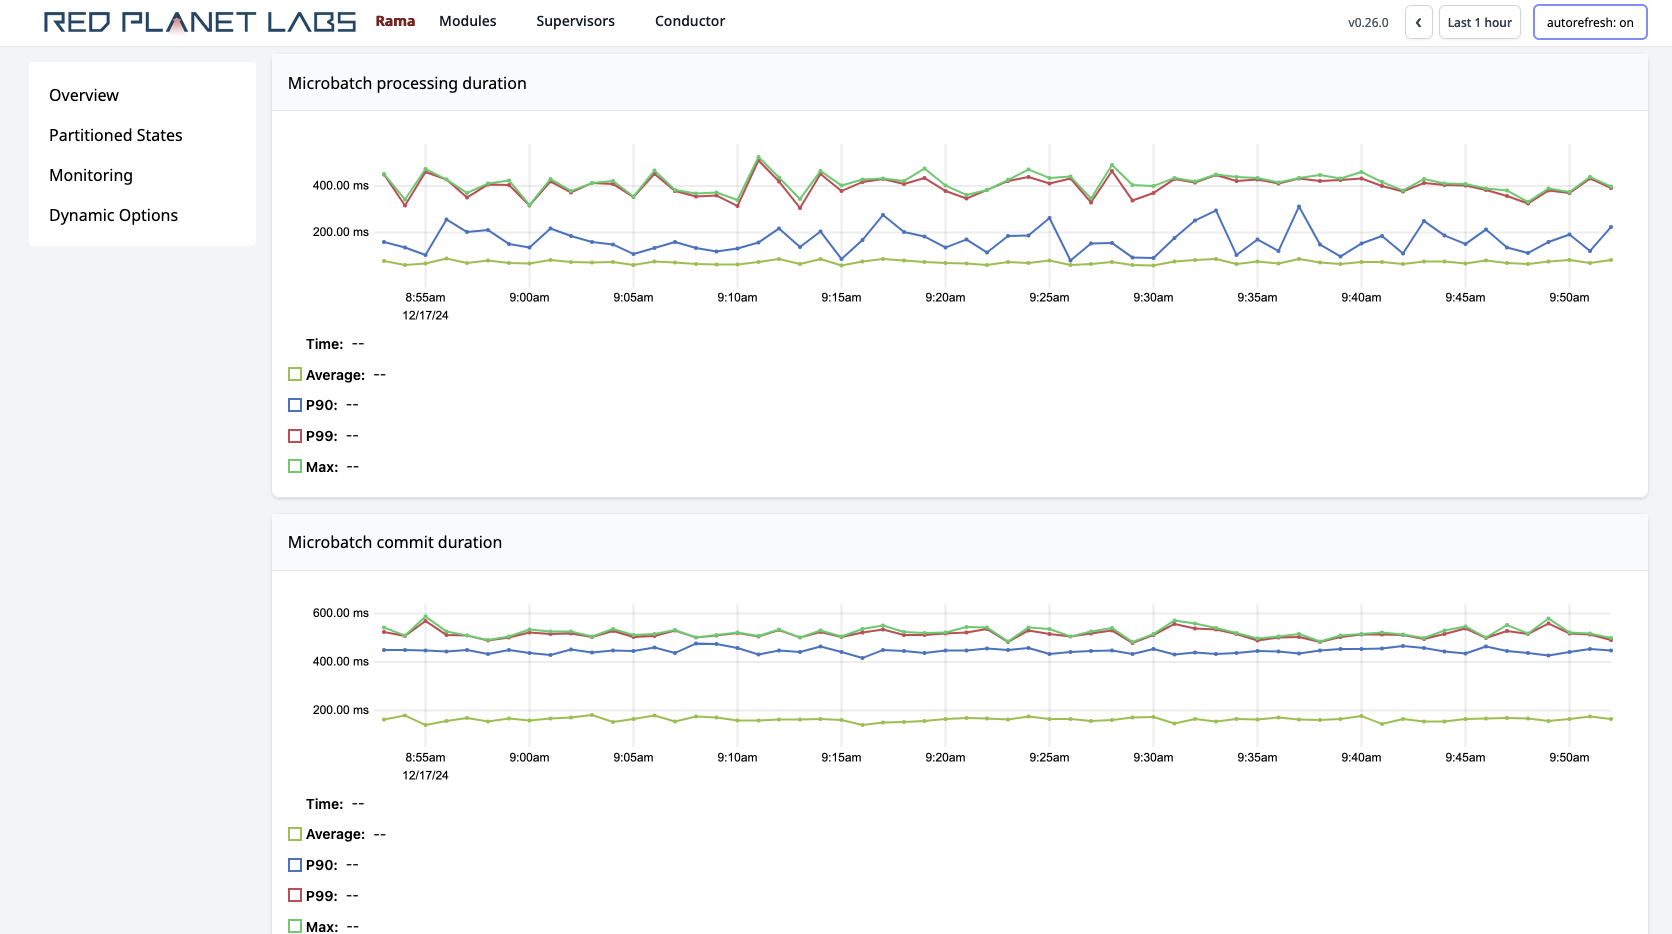
The microbatch and stream topology "progress" metric can also be an indicator you need to scale. For example:
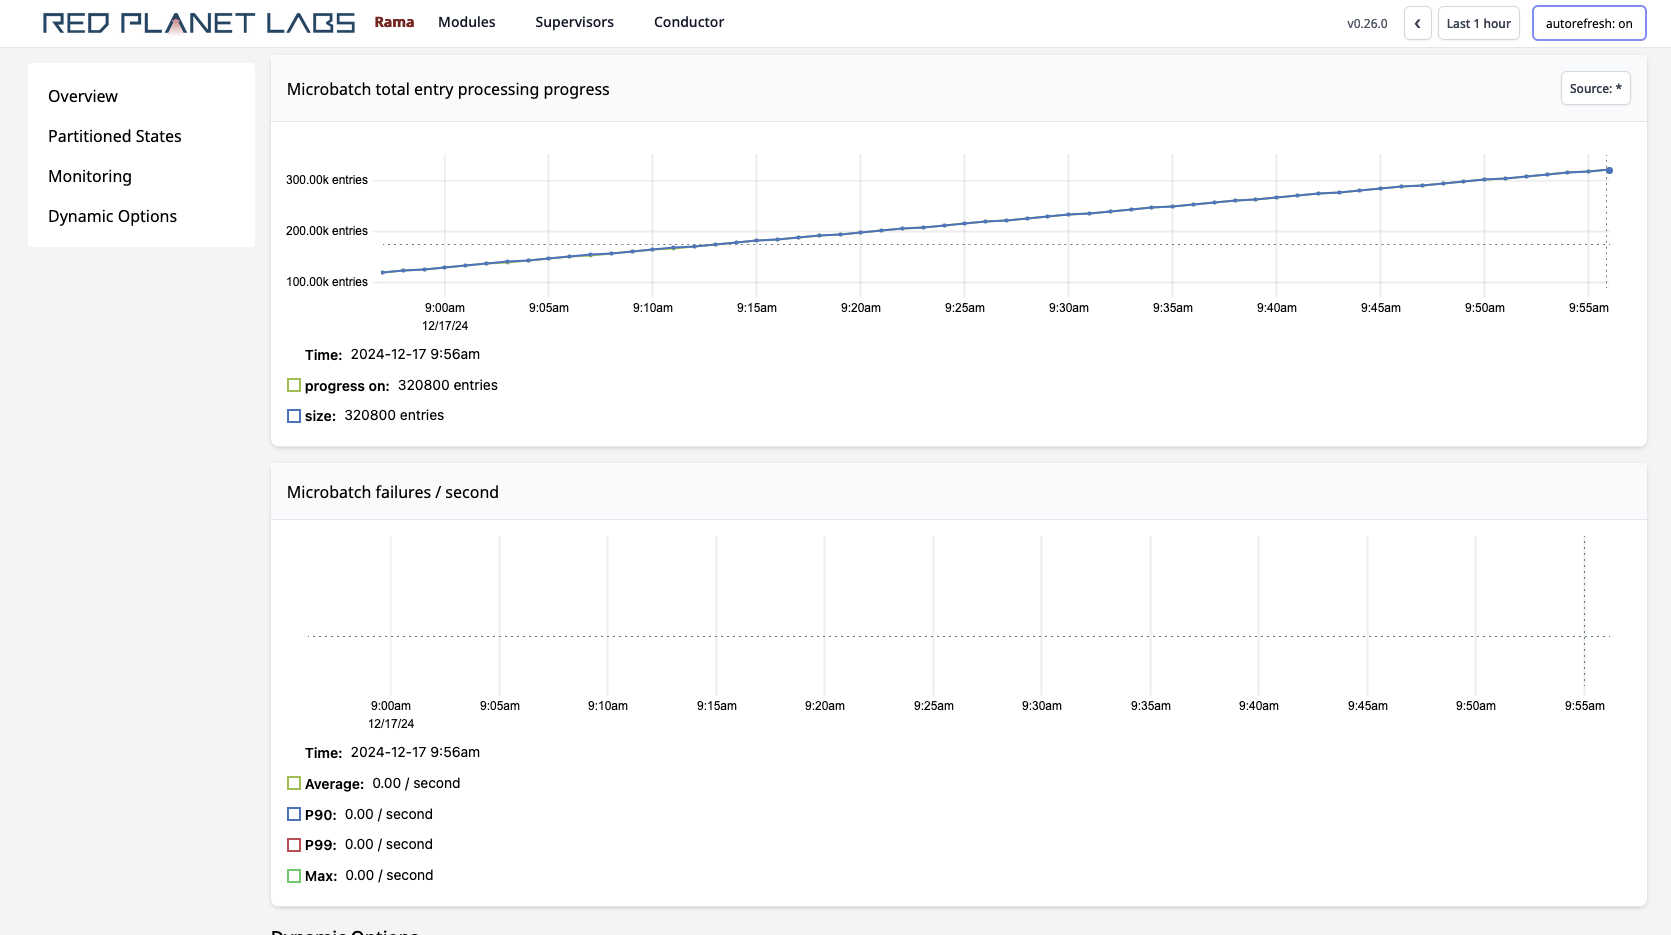
In this image the microbatch topology is keeping up so the "progress" and "size" lines are on top of one another. If those lines diverge, then you don’t have enough resources and need to scale.
The best way to know when you’ll need to scale is by testing your modules on a dev cluster. In this environment you can measure the exact relationship between max throughput and the number of nodes allocated to a module. When testing this way, you’ll also want to mimic the expected number of incoming PState queries and query topology invokes since those also use up resources.
Task scaling
Currently Rama does not support changing the number of tasks for a module, though adding support for this is high priority for us. Since the number of threads must be less than or equal to the number of tasks, and the number of workers must be less than or equal to the number of threads, the number of tasks represents an upper limit to how high a module can be scaled.
When setting the number of tasks for a module, you should choose a number in anticipation of how much your application will grow in the next couple years. Note that there is some overhead per task, so you shouldn’t set the number of tasks too high. Having something like 16 tasks per thread is reasonable though.
Until first-class task scaling is implemented, there are ways to manually increase the number of tasks. One way is to launch a new module with the same code and more tasks that recomputes all PStates from scratch. This new module would set up a mirror to each depot and set up each topology to start processing each depot from the beginning. The processing would also make new depots that are a copy of the old depots. When the new module gets close to catching up, you would stop processing and all depot appends on the original module. Once it’s fully caught up, you would update the new module to remove the mirrors and source data from its own depots. Lastly, you would redirect clients to get depot and PState clients from the new module.
This approach only works if your processing is deterministic, which may not be the case if your processing makes use of any random numbers (such as UUIDs). An alternative approach is to repartition the PStates directly by making a special topology in the new module to iterate through the original PStates and repartition them to the new module’s PStates.
Of course, both these approaches require careful coding and significant downtime which is why implementing first-class task scaling is a high priority for us.
Activating self-monitoring
Rama provides a special "monitoring module" that will automatically collect, analyze, index, and visualize detailed telemetry on all modules running on a cluster. This telemetry is displayed throughout dozens of charts on the Cluster UI and is invaluable for diagnosing and debugging issues.
To active self-monitoring, all you have to do is deploy the monitoring module using a command like the following:
rama deploy \
  --action launch \
  --systemModule monitoring \
  --tasks 32 \
  --threads 8 \
  --workers 4 \
  --replicationFactor 2
The only difference in the rama deploy command here as compared to deploying your own modules is the lack of a --jar flag and using --systemModule instead of --module. Otherwise, this module is deployed and operated just like any other module, and you should make sure to scale the module as appropriate as the number of modules on the cluster grows. As a rule of thumb, the monitoring module should have one worker per 70 workers from other modules.
If you’re using the isolation scheduler, you can reference the isolation module in the config as monitoring. For example, this could be the isolation config in the rama.yaml for the Conductor:
conductor.assignment.mode:
  type: isolation
  modules:
    monitoring: 2
    com.mycompany.MyModule: 8
    com.mycompany.AnotherModule: 26
We highly recommend running the monitoring module on every cluster since it provides a huge amount of fine-grained, useful information and uses a relatively small amount of resources.
Configuring telemetry retention
The PStates the monitoring module maintains accumulate a fair amount of disk space, especially for telemetry at the minute granularity. The monitoring module can be configured to delete old telemetry at any granularity in order to reduce disk space. This is done with the rama monitoringConfig command. To set the retention window to only keep thirty days of data at minute granularity, you would use the following command:
rama monitoringConfig --setRetention 60,2592000Times are specified in seconds, so this says to keep 2592000 seconds of data (thirty days) at the 60 second granularity.
You can run rama monitoringConfig help to see the full set of options available for configuring retention.
Cluster UI
The Cluster UI is a web-based interface providing a wealth of information on a Rama cluster and modules running on that cluster. By default it runs on port 8888 on the Conductor, but the port can be changed in the Conductor’s rama.yaml via the cluster.ui.port config.
Let’s take a brief tour of the information available in the Cluster UI. We won’t look at every page, but we’ll look at enough to give a general idea of what’s available. Here’s the main page of the Cluster UI:
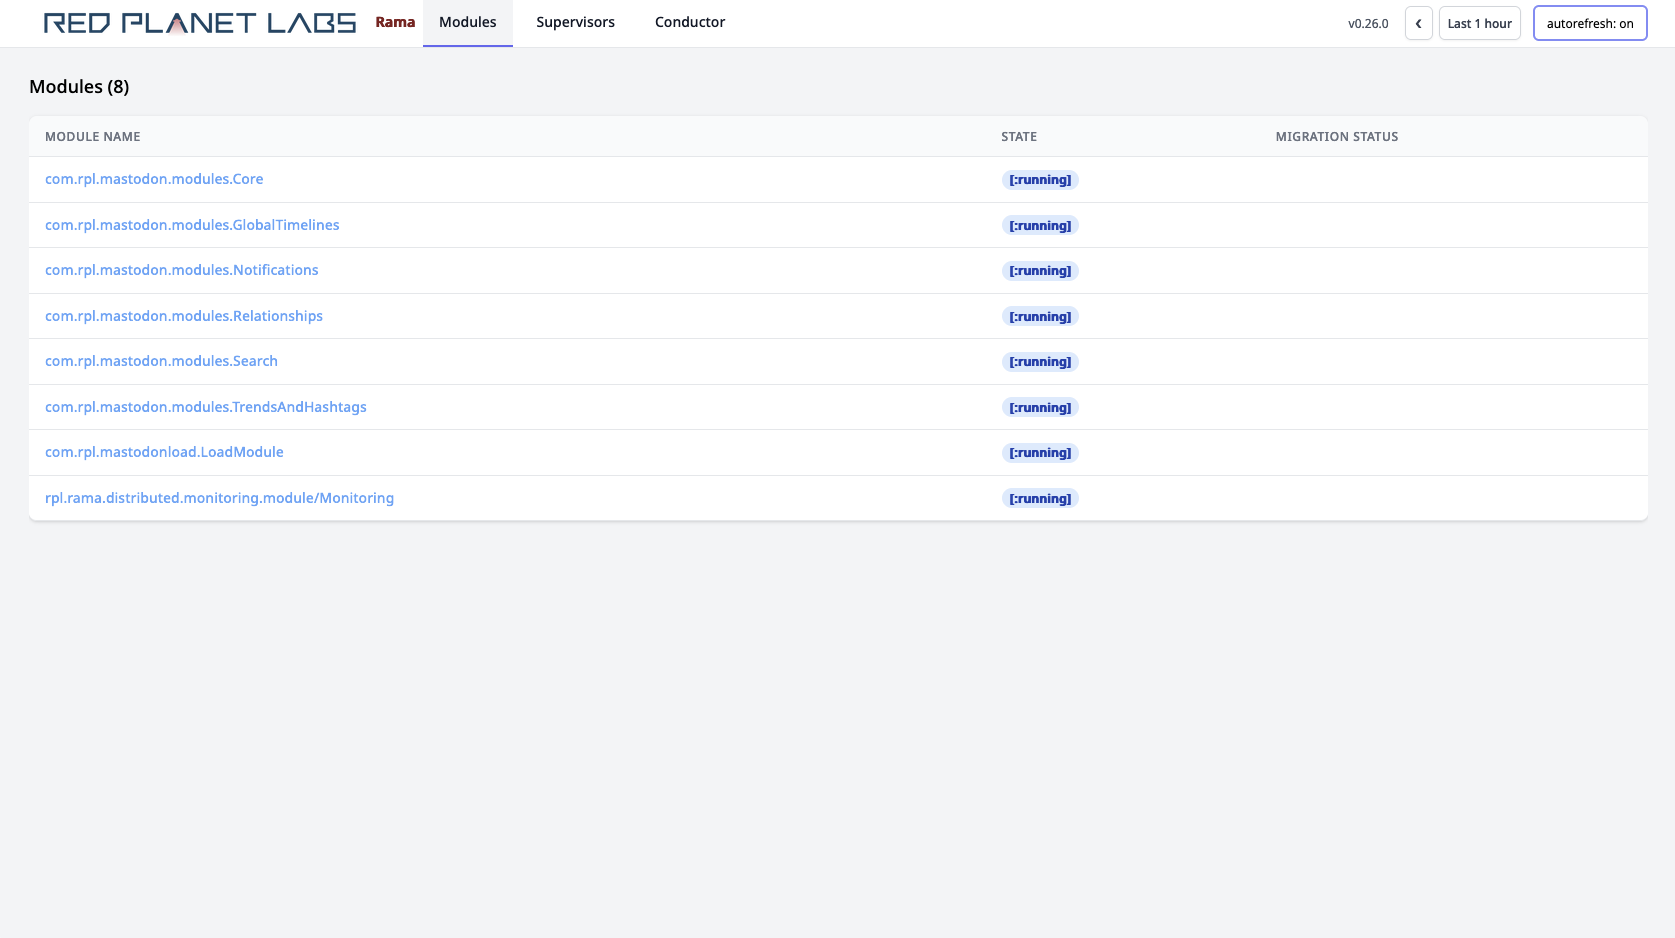
All deployed modules are listed along with their current state. The state refers to how the module is progressing through module operations such as launch, update, or scaling. When these operations have completed the module will be in the [:running] state. Sometimes you may see modules in the [:leadership-balancing] state. In this state Rama has found an imbalance of leaders across module workers and forces the minimal number of leader switches necessary in order to balance leadership. This is important since all work goes through leaders, so an imbalance would cause unnecessary skew of load for a module. Leaders can become imbalanced when a cluster has node outages.
The Supervisors tab lists all Supervisors for the cluster, and clicking on a Supervisor displays general information and telemetry for the node. The telemetry includes memory usage and garbage collection stats for the Supervisor and a graph of the system load average over time. The Conductor tab shows similar telemetry for the Conductor process and node.
On the top-right of the UI you can change the time window for charts, such as looking at the past hour of data or looking at the past year of data. The monitoring module computes and indexes every stat at multiple granularities to be able to support these large time windows efficiently. When the autorefresh button is on, all information on a page will refresh every ten seconds.
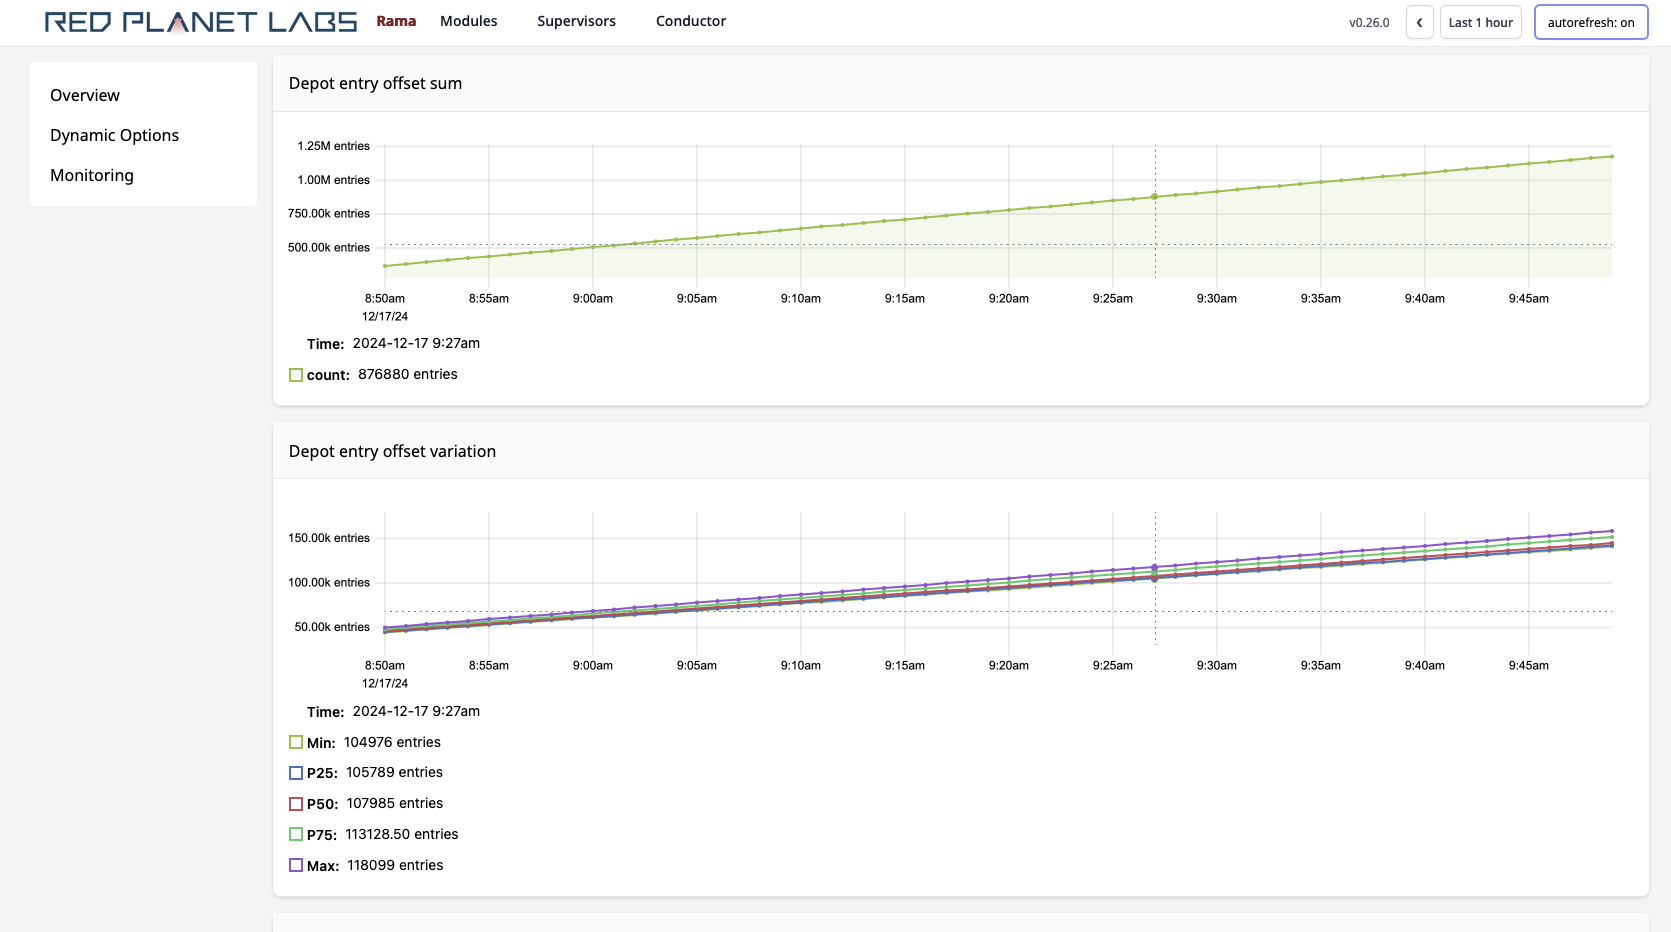
Clicking on a module brings up the module page. For example:
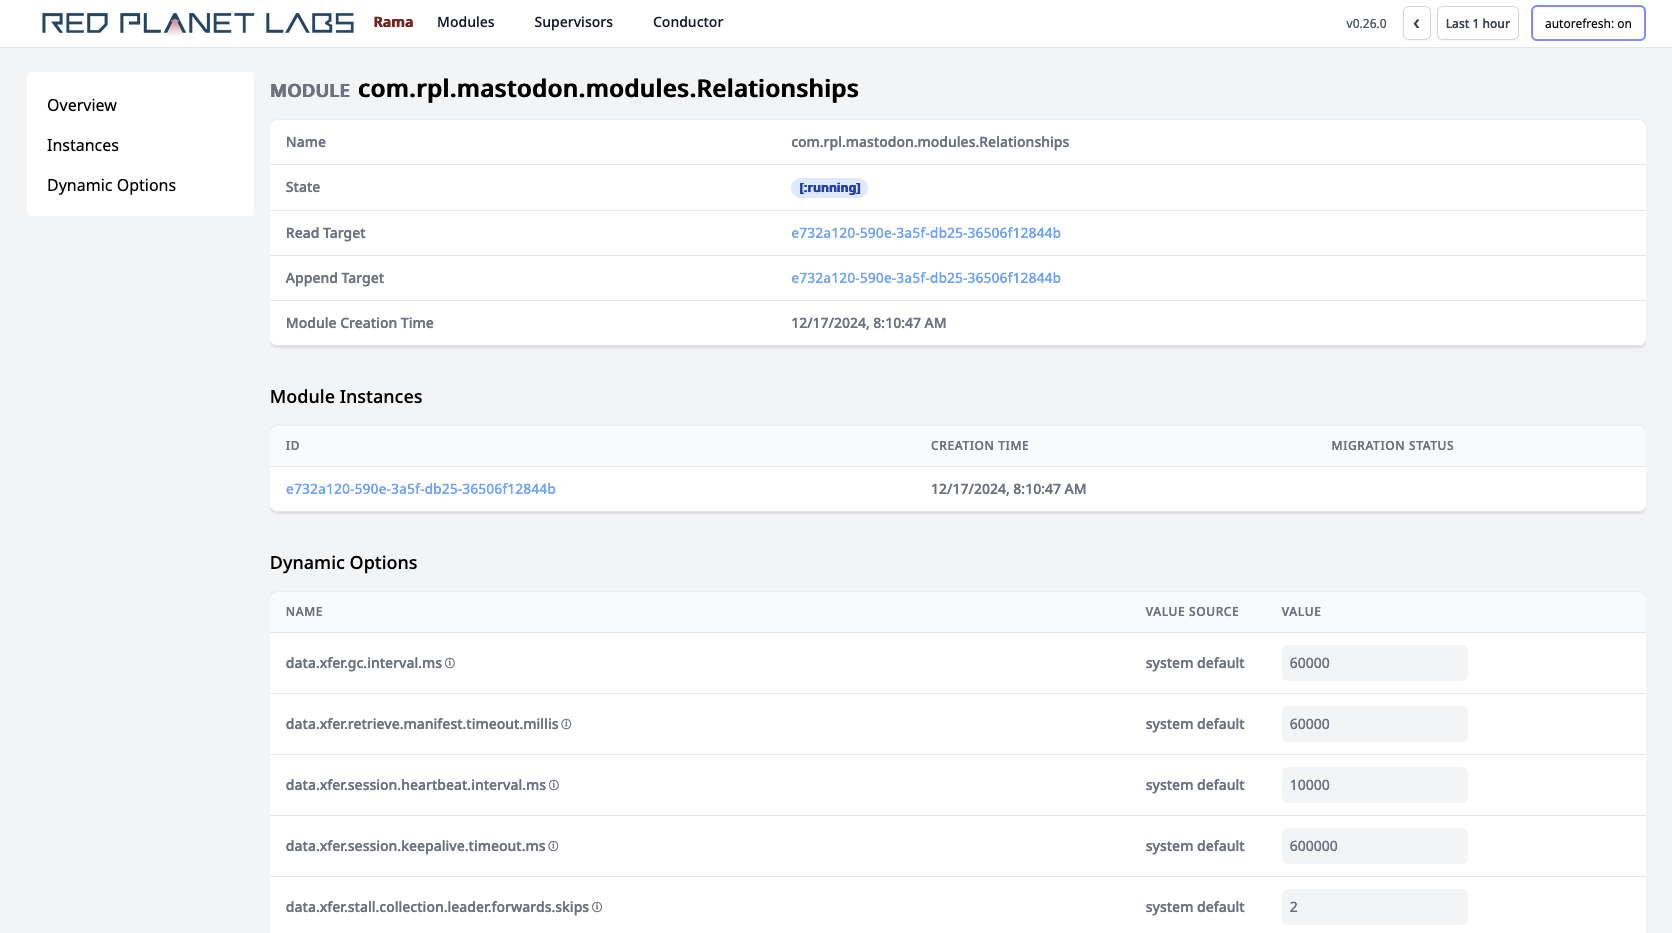
This page lists each module instance for the module. You’ll only see one module instance here unless the module is undergoing a transition like module update or module scaling. The "read target" and "append target" refer to internal flags used to coordinate a module transition.
On this page you can also set module level dynamic options. The ⓘ symbols, when hovered over, display a short string describing the dynamic option. You can set topology, depot, and PState level dynamic options on the pages for those entities.
Clicking on the module instance brings up this page:
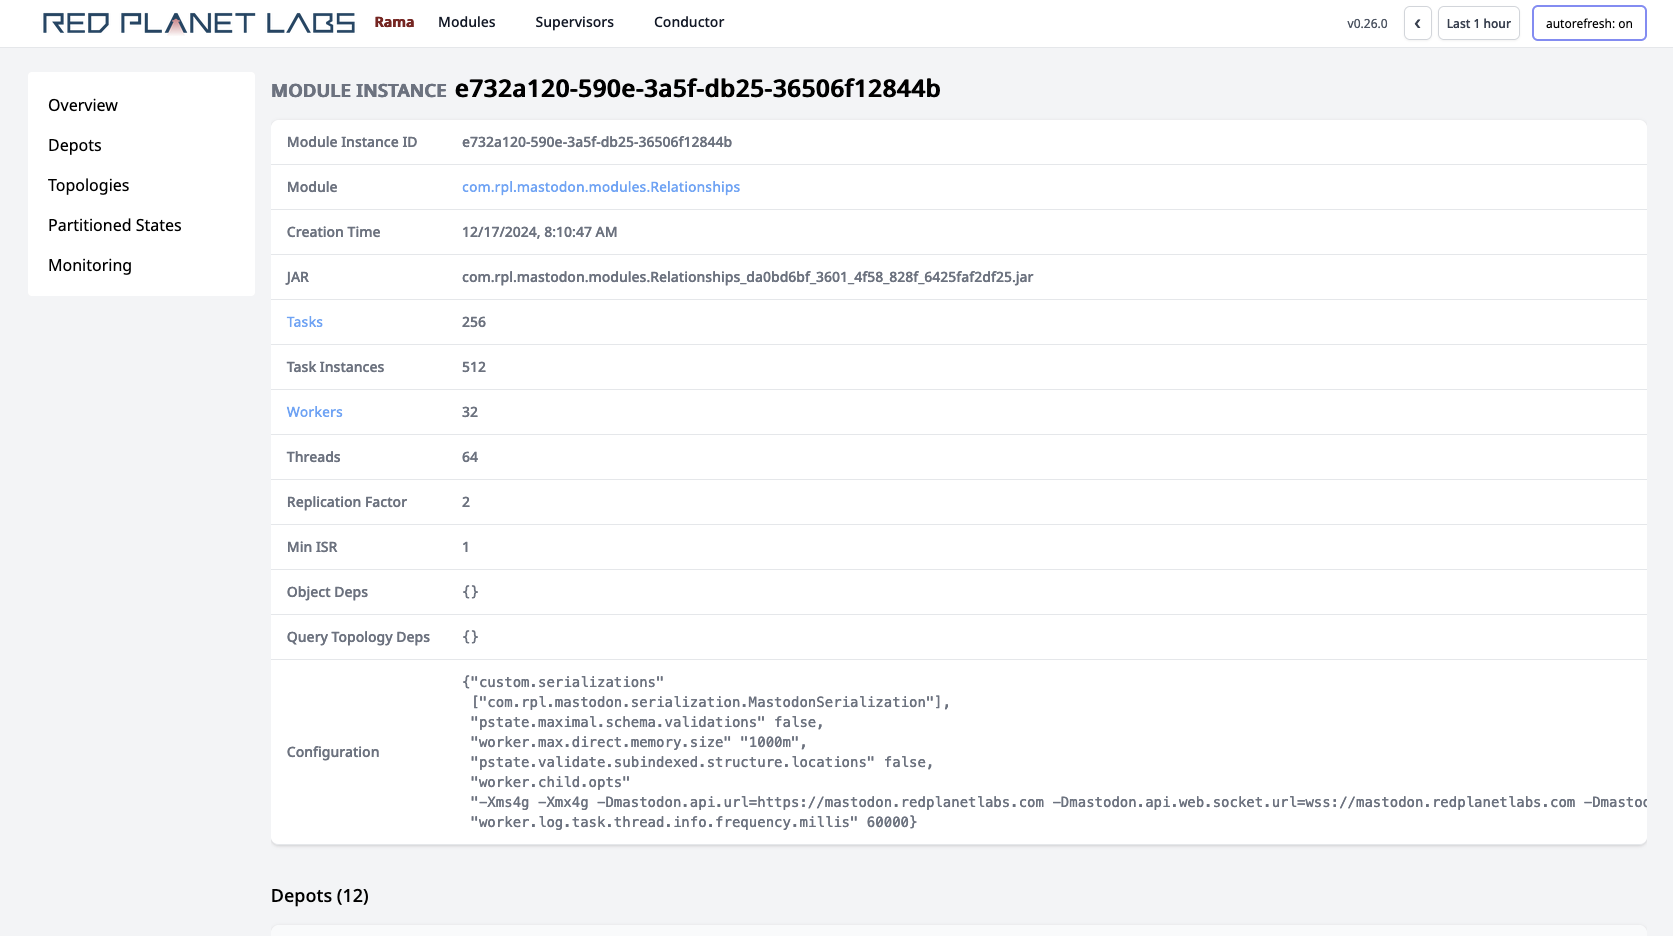
On this page you can see all the depots, PStates, and topologies defined for this module instance. You’ll also see internal PStates used by Rama in its implementation in the PStates section. Some of these PStates are in-memory and unreplicated (e.g. buffers for two-phase aggregation), and some of them are durable and replicated (e.g. stream topology progress state).
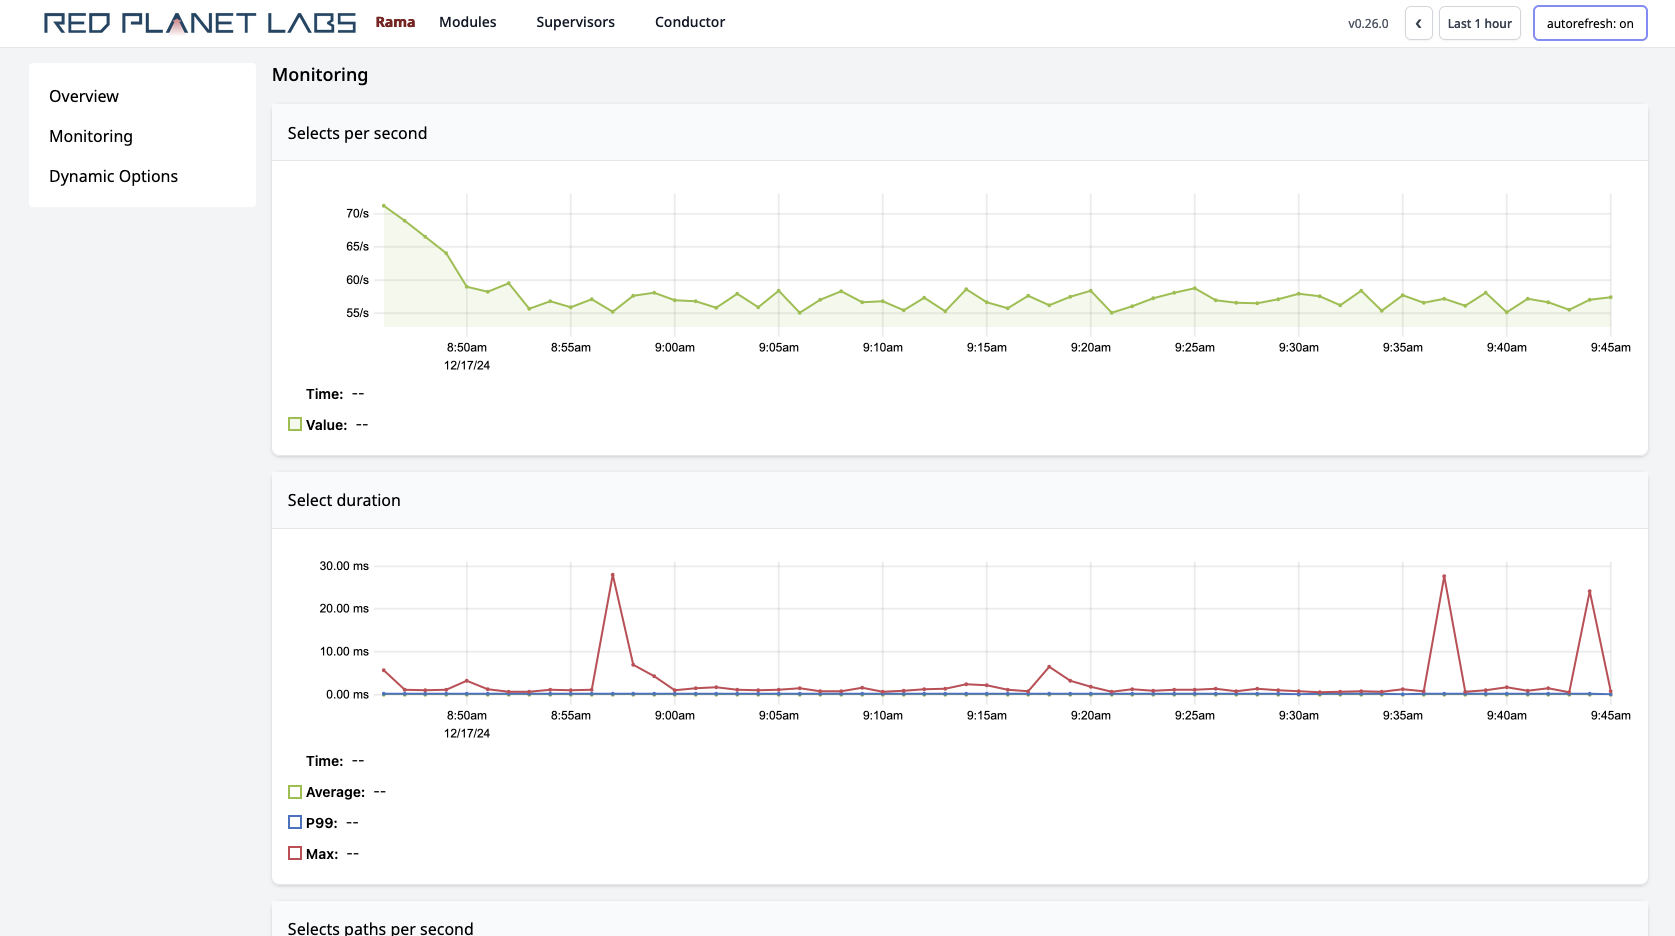
Below those are many charts aggregating telemetry for the module instance across all workers. For example:

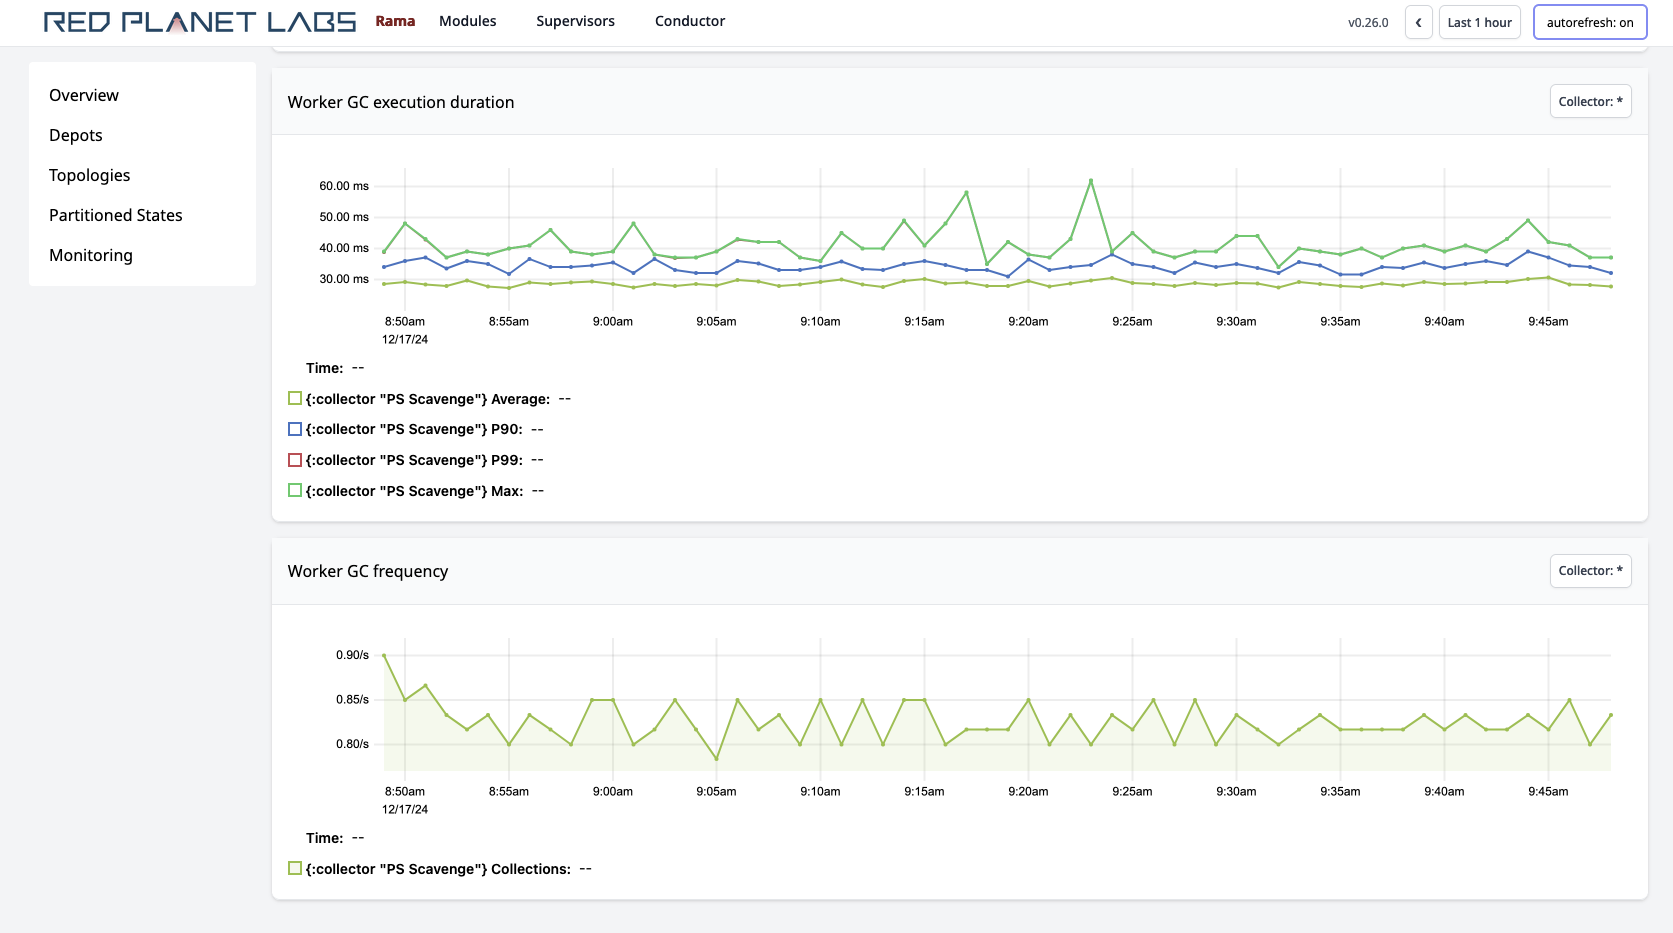
"Task groups load" is one of the most important metrics. It represents the percentage of time a task thread spends executing events vs. sitting idle waiting for events to arrive. It can be a strong indicator for when a module needs to be scaled. On the module instance page, you can see the average task thread load across all task threads in the module as well as the maximum task thread load across all task threads.
The "System event throughput (sampled)" and "System event execution duration (sampled)" metrics provide extremely fine-grained information on what’s going on inside a module. A random sample of events in Rama is categorized and timed, and these charts allow you to explore the throughput and durations for all the categories. The sample rate can be adjusted with the dynamic option worker.event.telemetry.sampling.rate, but keep in mind that adjusting it too high will have a noticeable impact on module performance. The events displayed here include both the events executing module code as well as internal events supporting the execution of modules (e.g. replication, telemetry collection, cleanup events).
The event categories are organized into a hierarchy, and you can see the aggregated metrics for any node in that hierarchy by selecting that node in the drop-down on the top-right of the chart. For example, selecting in that dropdown [:all :replication] shows the combined stats for all replication related events. Selecting [:all :replication :leader :forwarding] shows stats only for replication events related to leaders forwarding replog entries to followers. Categories containing :topology-event are events that are executing module code (e.g. [:all :microbatch :whoToFollow :topology-event] is the category for events executing the topology named "whoToFollow").
These are only a few of the metrics available on this page. All the charts available via the Cluster UI are invaluable for diagnosing any issues that occur.
The Workers link lets you navigate to a page specific to each worker, where you’ll see the same telemetry as the module instance page except specific to that worker. If you had skew in the amount of data being processed by each worker, you’d be able to see that by comparing the worker pages.
Clicking on depots, PStates, or topologies navigates to pages specific to those entities. Those pages have their own telemetry specific to them. For example:
On microbatch topology pages, you’ll also see a button you can use to "Pause" or "Resume" the topology. This is the only action available in the Cluster UI, as currently all other actions are performed through the Rama CLI.
Decommissioning a node
Machines can fail for all sorts of reasons. The Rama CLI command for module update provides the option --reassignSupervisors to get workers currently assigned to a failed machine relocated to another node. Rama never reassigns workers automatically and will only assign workers in response to a module operation (module launch, module update, or module scaling).
The additional argument given to module update is used like so:
./rama deploy \
   --action update \
   --reassignSupervisors 0a150494-7951-523f-f30a-8539e3b44892 \
   --jar test-0.0.1.jar \
   --module com.mycompany.MyModule \
   --configOverrides overrides.yaml
Every Supervisor has a unique ID which you can look up on the Cluster UI. Running this command will relocate workers for the module running on that node to other nodes. The command respects the isolation scheduler, and it requires sufficient spare capacity be available for moving the workers. You can reassign multiple supervisors at once by passing a comma-separated list to --reassignSupervisors.
If you have multiple modules with workers assigned to that node, you’ll need to run a separate module update for each module.
The reassignSupervisors option has no reliance on communicating with workers on the target nodes or executing any computation on those nodes. It assumes the worst case that the processes are down, unresponsive, or faulty in some way. It’s recommended you kill the Supervisors and all worker processes on those nodes before running the update command to ensure other modules don’t get assigned to those nodes later.
The reassign command as shown also requires that workers on the target node not be the only members of the ISR for any of their task groups. This can happen if the replication factor is one or if all other replicas happen to be in the OSR.
You can force the reassign to relocate all workers on a node regardless of ISR status with the flag --forceReassign. The reason this isn’t automatic is because reassigning a task group that’s the only member of its ISR means all data for PState and depot partitions on that task group is lost. Because Rama presumes the worst case of the node being inaccessible or broken in some way, it doesn’t try to transfer any data off of that node in this case. Keep in mind that with replication and a sensible Min-ISR setting, this scenario is extremely unlikely. We recommend a replication factor of three and a min-ISR of two.
Upgrading a Rama cluster to a new version
Rama has built-in mechanisms for upgrading a cluster to a new Rama version and transitioning all data between the old and new versions. There are two ways to upgrade a Rama cluster: "patch version upgrades" and "atomic version upgrades". During a patch version upgrade the Rama cluster and modules are fully operational, but it can only be done when only the patch version changes (e.g. 0.13.0 to 0.13.1). An atomic version upgrade can be done between any Rama versions and requires taking some downtime on the cluster. Though if you prepare, the whole process for an atomic version upgrade can be done in 5-10 minutes.
Patch version upgrade
A patch version upgrade is a rolling upgrade procedure where one node is upgraded at a time. If you follow the procedure below and are running your modules with a replication factor of at least two, the cluster will remain fully operational through the whole process (no downtime on depot appends, queries, topology processing, or anything else).
The steps for a patch version upgrade are the following. If modules are running without replication, skip the steps for the disallowLeaders and allowLeaders commands.
-
For each supervisor ID in the cluster (supervisor IDs for each node can be found in the "Supervisors" tab on the Cluster UI):
-
Run the CLI command
./rama disallowLeaders <supervisorId> -
Turn off process supervision for the supervisor (e.g.
systemd). -
Kill all supervisor and worker processes on that node using
kill -9. -
Upgrade the Rama release on the node, making sure the
rama.yamlfile points to the samelocal.diras before. -
Turn process supervision back on, and make sure the supervisor and all workers restart.
-
Run the CLI command
./rama allowLeaders <supervisorId> -
Wait one minute to allow the cluster to rebalance leaders back onto this node.
-
-
On the Conductor node:
-
Turn off process supervision for the conductor (e.g.
systemd). -
Kill the conductor process with
kill -9 -
Upgrade the Rama release on the node, making sure the
rama.yamlfile points to the samelocal.diras before. -
Turn process supervision back on, and make sure the conductor restarts.
-
-
Restart all clients with the Rama dependency updated to the new Rama version.
The upgrade of each supervisor node should take about 3-4 minutes. Most of that time is waiting for processes to launch. So for a 100 node cluster, this procedure should take about 5 to 7 hours.
Atomic version upgrade
A module submitted to one Rama version isn’t compatible with a Rama version with a major or minor version difference, and part of the atomic upgrade process is resubmitting all modules with the new version. Likewise, clients are also only compatible with clusters at the same major and minor Rama version. So along with upgrading a cluster and all modules, all clients need to be upgraded as well.
Check the release notes for any special procedures required to upgrade to a Rama version.
The steps for upgrading a Rama cluster are:
-
Shutdown the cluster using the
shutdownClustercommand from Rama CLI -
Kill Conductor and Supervisor processes and process supervision
-
Unpack Rama release for the new version on all nodes
-
Configure
rama.yamlin each Rama release with the samelocal.diras the previous version -
Start Conductor and Supervisor processes and process supervision for new version
-
Submit each module with the Rama CLI from the new version
-
Wait for the upgrade to complete
Let’s now expand on each of these steps.
The first step is shutting down the Rama cluster using the Rama CLI command rama shutdownCluster. For safety reasons, this command can only be run on the Conductor node. This command will gracefully bring down all worker processes, but it will not kill any Conductor or Supervisor processes. The shutdown process is complete when the Conductor page on the Cluster UI page says the Conductor state is [:cluster-shutdown-complete]. You must wait for the Conductor to reach this state before proceeding to the next step.
The next step is to shut down all Conductor and Supervisor processes. Since those should be run with a process supervision tool like systemd, Rama does not kill those processes itself. You should make sure to disable process supervision as well when bringing those processes down.
The next step is to unpack the new Rama release on all nodes. You should then configure its rama.yaml file and ensure the local.dir config specifies the same location as was used by the previous Rama version.
Next, start the Conductor and all Supervisor processes using your process supervision tool. These processes will go into "upgrade mode".
At this point, all modules need to be upgraded to the new version. The Cluster UI will display the list of modules that still need to be upgraded.
To upgrade a module, use the Rama CLI (from the new version) and run a command like:
rama deploy \
--action upgrade \
--jar target/my-application.jar \
--module com.mycompany.MyModule \
--configOverrides overrides.yaml
If there are any API changes with the new version, you’ll need to make those changes with the upgrade. And just like module update, the --upgrade command requires you to submit config overrides from scratch. Otherwise, things like custom serializations and worker child opts won’t be set properly on the upgraded module.
Upgraded modules must be identical to the prior module version in terms of PStates, depots, and topologies. The Conductor will reject an upgrade if there are any differences.
If you have the monitoring module deployed, that needs to be upgraded as well. The command for that is:
rama deploy --action upgrade --systemModule monitoringOnce all modules have been upgraded, Rama will automatically perform any metastore or on-disk changes necessary. It will then launch workers for all the modules and resume normal operation.
Finally, be sure to upgrade all Rama clients to the new version as well so they can interact with the upgraded cluster.
Summary
Rama provides the tooling you need to operate clusters over long periods of time. Self-monitoring gives you insights to understand performance and diagnose issues. Module update and module scaling let you evolve running applications to incorporate new features, fix bugs, and handle increased load. Lastly, the rama reassign command lets you handle the need to decommission nodes when they go bad.
There’s a lot to learn about operating Rama clusters. The breadth of scope of what Rama does is far greater than most other software tools. But the alternative to using Rama is to use many different tools, sometimes dozens, each of which handles only a narrow function of building a backend. So although there may feel like a lot to learn to use Rama, it’s vastly simpler in the long run to operate one tool than many tools with inconsistent designs around how they work and how they’re operated.